Robot Framework User Guide
Version 2.0
Table of Contents
1 Getting started
1.1 Introduction
Robot Framework is a Python-based, extensible keyword-driven test automation framework for end-to-end acceptance testing and acceptance-test-driven development (ATDD). It can be used for testing distributed, heterogeneous applications, where verification requires touching several technologies and interfaces.
1.1.1 Why Robot Framework?
- Enables easy-to-use tabular syntax for creating test cases in a uniform way.
- Provides ability to create reusable higher-level keywords from the existing keywords.
- Provides easy-to-read result reports and logs in HTML format.
- Is platform and application independent.
- Provides a simple library API for creating customized test libraries which can be implemented natively with either Python or Java.
- Provides a command line interface and XML based output files for integration into existing build infrastructure (continuous integration systems).
- Provides support for Selenium for web testing, Java GUI testing, running processes, Telnet, SSH, and so on.
- Supports creating data-driven test cases.
- Has built-in support for variables, practical particularly for testing in different environments.
- Provides tagging to categorize and select test cases to be executed.
- Enables easy integration with source control: test suites are just files and directories that can be versioned with the production code.
- Provides test-case and test-suite -level setup and teardown.
- The modular architecture supports creating tests even for applications with several diverse interfaces.
1.1.2 Screenshots
Following image shows screenshots of Robot Framework test data, test reports and test logs.
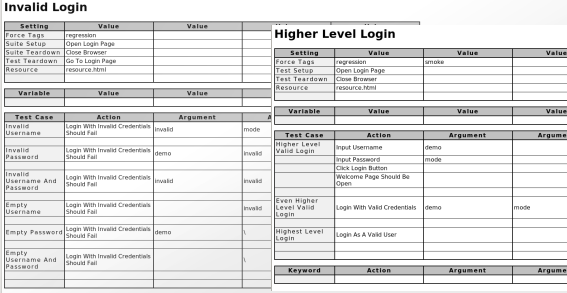
Example test case files
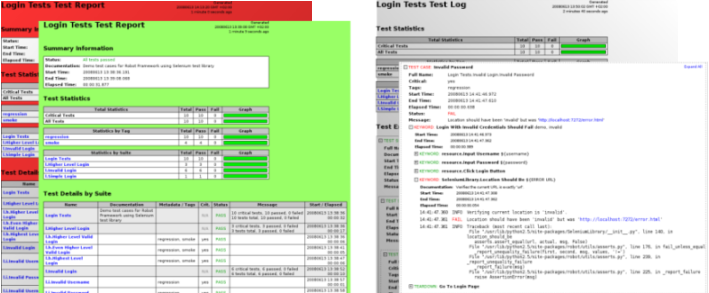
Example report and log files
1.1.3 High-level architecture
Robot Framework handles the processing of test data, the controlling of test execution and the reporting of results for testing. The testing and interaction with the target under test is done by test libraries that are plugged into Robot Framework. Test libraries may internally use other test tools, but this is not visible to Robot Framework.
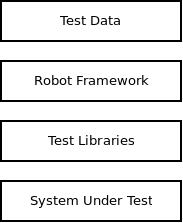
High-level architecture
As shown in the figure, Robot Framework's role in a test framework is to take test data, process it into a format that is appropriate for the attached test libraries, invoke the test libraries with the appropriate arguments, receive the data about the test from the test libraries, and then report it. The test libraries are responsible for interacting with the target under test.
1.2 Copyright and license
Robot Framework itself, test libraries and supporting tools distributed with it, as well as this user guide and other provided documentation have the following copyright statement.
Copyright 2008 Nokia Siemens Networks Oyj

Licensed under the Apache License, Version 2.0 (the "License");
you may not use this file except in compliance with the License.
You may obtain a copy of the License at

    http://www.apache.org/licenses/LICENSE-2.0

Unless required by applicable law or agreed to in writing, software
distributed under the License is distributed on an "AS IS" BASIS,
WITHOUT WARRANTIES OR CONDITIONS OF ANY KIND, either express or implied.
See the License for the specific language governing permissions and
limitations under the License.
1.3 Installation and uninstallation
1.3.1 Introduction
There are two ways to install Robot Framework:
- Installing from source
- You can get the source code either as a source distribution package or directly from version control system. In the former case, first extract the package somewhere, and as a result, you have a directory named robotframework-<version>. Detailed instructions follow, but in short, what you need to do is to go to the created directory and run the python setup.py install command.
- Using binary installers
- Binary installers are platform-specific. There is currently only one binary distribution available, a graphical installer for Windows.
Installation packages are available from http://downloads.robotframework.org, and source code from http://source.robotframework.org.
1.3.2 Preconditions
Robot Framework runs both on Python and Jython, and you need to have at least one of them to be able to use it. However, the provided installers only work with Python, so installing it is always recommended.
Python installation
Python 2.5 is recommended, although Python 2.4 and 2.3 are also supported. On most UNIX-like systems, you have Python installed by default. If you are on Windows or otherwise need to install Python yourself, your best place to start is probably the Python homepage. There you can download a suitable installer and get more information about the installation and Python in general.
Note
The Python installation framework coming with Python 2.3 does not have functions for copying other than Python files. Robot Framework itself can be installed with it without problems, but, for example, installing certain libraries may require copying those non-Python files manually.
Jython installation
Using test libraries implemented with Java or using Java tools directly requires running Robot Framework on Jython, which then requires Java Runtime Environment (JRE). The minimum required Java version is 1.4, but newer versions are recommended, as they tend to be faster with dynamic languages, such as Jython. Both Sun and IBM Java versions are supported.
Robot Framework requires Jython version 2.2. The earlier Jython version 2.1 is not compatible with Robot, and also 2.2 betas and alphas have some problems and are not supported. Unfortunately, also Jython 2.2.1 has certain Unicode problems (for more information, see http://bugs.jython.org/issue1802339 and http://bugs.jython.org/issue1032), which makes it incompatible with Robot Framework. Hopefully these problems will be fixed in future versions.
Installing Jython is a fairly easy procedure. First you need to get an installer from the Jython homepage or directly from http://downloads.sourceforge.net/jython/jython_installer-2.2.jar. Note that the installer is an executable JAR package, which you need to run as java -jar jython_installer-2.2.jar. Depending on your system, the installer runs either in the graphical or the textual mode, but in both cases, the actual installation procedure is very easy.
When installing Robot Framework, its installer tries to find the Jython executable on the system to create the jybot runner script correctly. Jython is found if:
Jython can be executed in the system directly (i.e. it is in the PATH).
An environment variable JYTHON_HOME is set and it points to the Jython installation directory.
The Jython installation directory is found. On Windows, it is searched from the C:\ and D:\ drives, and on other systems from the /usr/local and /opt directories. The directory is found if it is under the searched directories mentioned above, or one level deeper. For example, the following Jython installation directories would be found by the installer:
C:\APPS\Jython2.2
D:\Jython22
/usr/local/jython2.2
/opt/whatever/Jython22
If you plan to use Robot Framework only with Jython, you do not necessarily need Python at all. In that case, you need to perform a manual installation or have some custom installer.
1.3.3 Installation
Installing from source
You can get Robot Framework source code either directly from version control or as a source distribution package that needs to be extracted somewhere. In both cases, you should have a directory containing the source code, documentation, tools, templates, and so on.
You should be able to install Robot Framework to any environment where Python runs using a source distribution. The installation is done by going to the created directory from the command line, and after that running either of the following commands:
python setup.py install
python install.py install
setup.py is a standard Python installer script. It can take several parameters allowing, for example, installation into non-default locations not requiring administrative rights. It is also be used also for creating distribution packages.
install.py is a custom installation and uninstallation script for Robot Framework. When it is used for installation, it simply uses setup.py, and thus above commands are totally equivalent.
With both of these commands you get a rather long output, and something like the following text should appear at the end:
Creating Robot start-up scripts...

Installation directory: /usr/lib/python2.5/site-packages/robot
Python executable: /usr/bin/python
Jython executable: /cygdrive/c/jython2.2b2/jython.bat (found from system)
Pybot script: /usr/bin/pybot
Jybot script: /usr/bin/jybot
Rebot script: /usr/bin/rebot
Note
The paths vary based on your environment. Robot Framework uses the standard Python installation system and should operate in accordance with the host operating system conventions.
Using binary installers
Use the platform-specific way of installation. For example, on Windows, double click the provided executable and follow the instructions of the graphical installer.
Manual installation
If you do not want to install Python, or for some other reason do not want to use any automatic way of installing Robot Framework, you can always do it manually following these steps:
- Get the source code. All the code is in a directory (a module in Python) called robot. If you have a source distribution or a version control checkout, you can find it from the src directory, but you can also get it from an earlier installation.
- Copy the source code where you want to.
- Create the needed runner scripts. If you have a source package or a checkout, you can get templates from src/bin.
Where files are installed
When an automatic installer is used, the Robot Framework code is copied into a directory containing external Python modules. The actual location is platform-specific, but on computers with a UNIX-like operating system, it is normally something like /usr/lib/[PythonVer]/site-packages, and on Windows it is [PythonInstallationDir]\Lib\site-packages. The actual Robot Framework code is in a directory named robot.
Robot Framework runner scripts (pybot, jybot and rebot) are created and copied into another platform-specific location. On UNIX-like systems, they normally go to /usr/bin and are thus immediately available from the command line. On Windows, the operating system does not provide a similar natural place, and Python copies these scripts into [PythonInstallationDir]\Scripts.
Setting up environment
After the installation, you might want to make Robot Framework's runner scripts easily available from the command line. On UNIX-like systems, that should be the case automatically, but for example on Windows, it is not. In environments where startup scripts are not available, the directory containing them must be set to the PATH environment variable.
Setting the PATH environment variable on Windows:
- Open Start > Settings > Control Panel > System > Advanced > Environment Variables. There are User variables and System variables, and the difference between them is that User variables affect only the current users, whereas System variables affect all users.
- To edit the existing PATH, select Edit and add ;[PythonInstallationDir]\Scripts\ at the end of the value. Note that the leading colon (;) is important, as it separates different entries. To add a new value, select New and provide both the name and the value, this time without the colon.
- Start a new command prompt for the changes to take effect.
Verifying installation
To verify that the installation and environment setup were successful, type:
$ pybot --version
Robot 2.0 (Python 2.5.1 on cygwin)
To verify that Robot Framework works also with Jython, type:
$ jybot --version
Robot 2.2 (Jython 2.2 on java1.6.0_03)
In both cases, the exact version and platform information can, of course, differ from these. On Jython, you may also get some notifications from Jython's package manager upon the first execution.
1.3.4 Uninstallation
If Robot Framework has been installed using a source distribution, it can be uninstalled with command:
python install.py uninstall
If Robot Framework is installed from a binary distribution, it can be uninstalled via the mechanism offered by the operating system. For example, in Windows you simply go to Control Panel > Add/Remove Programs, where Robot Framework is listed under Python.
If uninstallation fails somehow, Robot Framework can be uninstalled by removing the framework code and runner scripts manually.
1.3.5 Upgrading
The procedure when upgrading or downgrading Robot Framework depends on the versions used:
- If you are upgrading from one minor Robot Framework version to another (for example, from 2.0 to 2.0.1), it is safe to install the new version over the old one, unless stated otherwise.
- If you are upgrading from one major Robot Framework version to another (for example, from 2.0 to 2.1), then it is highly recommended to uninstall the old version before the new installation.
- If you are downgrading, the rules are the same as for upgrading.
With source distributions upgrading is easy with command:
python install.py reinstall
1.4 Demonstration
Robot Framework does not currently have a standalone demo, but we plan to add one soon. However, SeleniumLibrary has an easily executable demonstration test suite available. It contains a simple standalone HTTP server and an application that is used as a system under test. The actual test case files and scripts for running the demonstration in different systems are also provided.
The demonstration, as well as instructions for running it, can be downloaded from SeleniumLibrary project page at http://code.google.com/p/robotframework-seleniumlibrary.
2 Creating test data
2.1 Test data syntax
This section covers Robot Framework's overall test data syntax. The following sections will explain how to actually create test cases, test suites and so on.
2.1.1 Files and directories
The hierarchical structure for arranging test cases is built as follows:
- Test cases are created in test case files.
- A test case file automatically creates a test suite containing the test cases in that file.
- A directory containing test case files forms a higher-level test suite. Such a test suite directory has suites created from test case files as its sub test suites.
- A test suite directory can also contain other test suite directories, and this hierarchical structure can be as deeply nested as needed.
- Test suite directories can have a special initialization file.
In addition to this, there are:
- Test libraries containing the lowest-level keywords
- Resource files with variables and higher-level user keywords
- Variable files to provide more flexible ways to create variables than resource files
2.1.2 Supported file formats
Robot Framework test data is defined in tabular format, using either the HTML (hypertext markup language) or TSV (tab-separated values) format. Robot Framework selects a parser for the test data based on the file extension. The extension is case-insensitive, and the recognized extensions are .html, .htm and .xhtml for HTML, and .tsv for TSV.
Source distribution contains both HTML and TSV test data templates and they can also be obtained from Robot Framework's download page.
HTML format
In HTML files, the test data is defined in separate tables (see the example below). Robot Framework recognizes these test data tables based on the text in their first cell. Everything outside recognized tables is ignored.
| Setting | Value | Value | Value |
|---|---|---|---|
| Library | OperatingSystem | ||
| Variable | Value | Value | Value |
|---|---|---|---|
| ${MESSAGE} | Hello, world! | ||
| Test Case | Action | Argument | Argument |
|---|---|---|---|
| My Test | [Documentation] | Example test | |
| Log | ${MESSAGE} | ||
| My Keyword | /tmp | ||
| Another Test | Should Be Equal | ${MESSAGE} | Hello, world! |
| Keyword | Action | Argument | Argument |
|---|---|---|---|
| My Keyword | [Argument] | ${path} | |
| Directory Should Exist | ${path} |
Test data in HTML files can be edited with whichever editor you prefer, but a graphic editor, where you can actually see the tables, is recommended. There is also a tool called Robot IDE available that is actually designed for editing the test data.
HTML entity references (for example, ä) are supported. Additionally, any encoding can be used, assuming that it is specified in the data file. Normal HTML files must use the META element as in the example below:
<meta http-equiv="Content-Type" content="text/html; charset=UTF-8">
XHTML files should use the XML preamble as in this example:
<?xml version="1.0" encoding="Big5"?>
If no encoding is specified, Robot Framework uses ISO-8859-1 by default.
Note
Before Robot Framework version 1.8.4, the HTML test data was always assumed to be in ASCII format.
TSV format
In a TSV file, all the data is in one large table. Test data tables are recognized from an asterisk (*), followed by a normal table name. Robot Framework ignores any other asterisks in the name, so it can also be prefixed with another asterisk as in the example below. In TSV test data, everything before the first recognized table is ignored in Robot Framework.
| *Setting* | *Value* | *Value* | *Value* |
| Library | OperatingSystem | ||
| *Variable* | *Value* | *Value* | *Value* |
| ${MESSAGE} | Hello, world! | ||
| *Test Case* | *Action* | *Argument* | *Argument* |
| My Test | [Documentation] | Example test | |
| Log | ${MESSAGE} | ||
| My Keyword | /tmp | ||
| Another Test | Should Be Equal | ${MESSAGE} | Hello, world! |
| *Keyword* | *Action* | *Argument* | *Argument* |
| My Keyword | [Argument] | ${path} | |
| Directory Should Exist | ${path} |
You can create and edit TSV files in any spreadsheet program, such as Microsoft Excel. Select the tab-separated format when you save the file and remember to set the file extension to .tsv. The TSV format can be used in Robot Framework's test data for all the same purposes as HTML.
Robot Framework parses TSV data by first splitting all the content into rows and then rows into cells on the basis of the tabular characters. Spreadsheet programs sometimes surround cells with quotes (for example, "my value") and Robot Framework removes them. Possible quotes inside the data are doubled (for example, "my ""quoted"" value") and Robot Framework handles also them. If you are using a spreadsheet program to create TSV data, you do not need to pay attention to that, but if you create data programmatically, you have to add the same quotes as spreadsheets.
2.1.3 Test data tables
Test data is structured in four types of tables listed below. These test data tables are identified by the first cell of the table, and the last column in the table below lists different aliases that can be used as a table name.
| Table name | Used for | Aliases |
|---|---|---|
| Setting table | 2) Defining metadata for test suites
and test cases
|
Setting, Settings, Metadata |
| Variable table | Defining variables that can be used elsewhere in the test data | Variable, Variables |
| Test case table | Creating test cases from available keywords | Test Case, Test Cases |
| Keyword table | Creating user keywords from existing lower-level keywords | Keyword, Keywords, User Keyword, User Keywords |
2.1.4 Rules for parsing the data
Ignored data
When Robot Framework parses the test data, it ignores:
- All tables that do not start with a recognized table name in the first cell
- Everything else on the first row apart from the first cell
- Data outside tables in HTML and data before the first table in TSV
- All empty rows, which means these kinds of rows can be used to make the tables more readable
- All empty cells at the end of rows; you must add a backslash (\) to prevent such cells from being ignored
- All single backslashes (\); they are used as an escape character
- All characters following a hash mark (#), if it is the first character of a cell; this means that hash marks can be used to enter comments in the test data
- All formatting in the HTML test data
When Robot Framework ignores some data, this data is not available in any resulting reports and, additionally, most tools used with Robot Framework also ignore them. To add information that is visible in Robot Framework outputs, or available to, for example, Robot IDE, place it to the documentation or other metadata of test cases or suites, or log with the Log or Comment keywords available from the BuiltIn library.
Escaping
The escape character for the Robot Framework parser is the backslash (\). The escape character can be used as follows:
- To escape special characters so that their literal values are
used:
- \${notvar} means a literal string ${notvar} that looks like a variable
- \\ means a single backslash (for example, C:\\Temp)
- \# means a literal hash (#) mark, even at the beginning of a cell
- To affect the parsing of whitespaces
- To prevent Robot Framework from ignoring empty cells at the end of a row (this requires \ to be in the appropriate cell).
Handling whitespace
Robot Framework handles whitespace, such as spaces, newlines and tabs, the same way as they are handled in HTML. This means that Robot Framework:
- Removes leading and trailing whitespaces in all cells.
- Changes multiple consecutive spaces into single spaces.
- Converts all newlines and tabs into spaces.
To prevent Robot Framework from parsing data according to these rules, a backslash can be used:
- Before leading spaces, for example \ some text
- Between consecutive spaces, for example text \ \ more text
- After trailing spaces, for example some text \ \
- With n to create a newline, for example first line\n2nd line
- With t to create a tab character, for example text\tmore text
- With r to create a carriage return, for example text\rmore text
Dividing test data to several rows
If a keyword requires more arguments than there are columns available, it is not necessary to add more columns. Instead, it is possible to simply have three dots (...) below the original keyword name and continue arguments there. Arguments presented like this are parsed as if they were all in one row.
The same approach works also with settings and variables taking several values. In these cases, the three dots are, of course, placed under the setting or variable name.
Additionally, values of settings that take only one value (mainly documentations) can be split to several columns. These values will be then catenated together with spaces when the test data is parsed.
All these syntaxes are illustrated in the following examples. The first three tables show tables where test data has not been split, and the following three illustrate how fewer columns are needed after splitting the data to several rows.
| Setting | Value | Value | Value | Value | Value | Value |
|---|---|---|---|---|---|---|
| Default Tags | tag-1 | tag-2 | tag-3 | tag-4 | tag-5 | tag-6 |
| Variable | Value | Value | Value | Value | Value | Value |
|---|---|---|---|---|---|---|
| @{LIST} | this | list | has | quite | many | items |
| Test Case | Action | Argument | Arg | Arg | Arg | Arg | Arg | Arg |
|---|---|---|---|---|---|---|---|---|
| Example | [Documentation] | Documentation for this test case. This can get quite long... | ||||||
| [Tags] | t-1 | t-2 | t-3 | t-4 | t-5 | |||
| Do X | one | two | three | four | five | six | ||
| ${var} = | Get X | 1 | 2 | 3 | 4 | 5 | 6 |
| Setting | Value | Value | Value |
|---|---|---|---|
| Default Tags | tag-1 | tag-2 | tag-3 |
| ... | tag-4 | tag-5 | tag-6 |
| Variable | Value | Value | Value |
|---|---|---|---|
| @{LIST} | this | list | has |
| ... | quite | many | items |
| Test Case | Action | Argument | Argument | Argument |
|---|---|---|---|---|
| Example | [Documentation] | Documentation | for this | test case. |
| ... | This can get | quite | long... | |
| [Tags] | t-1 | t-2 | t-3 | |
| ... | t-4 | t-5 | ||
| Do X | one | two | three | |
| ... | four | five | six | |
| ${var} = | Get X | 1 | 2 | |
| ... | 3 | 4 | 5 | |
| ... | 6 |
2.2 Creating test cases
This section describes the overall test case syntax. Organizing test cases into test suites using test case files and test suite directories is discussed in the next section.
2.2.1 Test case syntax
Basic syntax
Test cases are constructed in test case tables from the available keywords. Keywords can be imported from test libraries or resource files, or created in the keyword table of the test case file itself.
The first column in the test case table contains test case names. A test case starts from the row with something in this column and continues to the next test case name or to the end of the table. It is an error to have something between the table headers and the first test.
The second column normally has keyword names. An exception to this rule is setting variables from keyword return values, when the second and possibly also the subsequent columns contain variable names and a keyword name is located after them. In either case, columns after the keyword name contain possible arguments to the specified keyword.
| Test Case | Action | Argument | Argument |
|---|---|---|---|
| Valid Login | Open Login Page | ||
| Input Name | demo | ||
| Input Password | mode | ||
| Submit Credentials | |||
| Welcome Page Should Be Open | |||
| Setting Variables | Do Something | first argument | second argument |
| ${value} = | Get Some Value | ||
| Should Be Equal | ${value} | Expected value |
Workflow tests vs. data-driven tests
In general, there are two kinds of test cases. So called workflow tests, such as the Valid Login test above, are constructed from several keywords. Their normal structure is that first the system is taken into the initial state (Open Login Page), then something is done to the system (Input Name, Input Password, Submit Credentials), and finally it is verified that the system behaved as expected (Welcome Page Should Be Open).
Another type of tests are data-driven test cases that contain only one higher-level keyword, normally created as user keywords. These kinds of tests are very useful when there is a need to test the same workflow with different input or output data, as the examples below demonstrate.
| Test Case | Action | User Name | Password |
|---|---|---|---|
| Invalid User Name | Login With Invalid Credentials Should Fail | invalid | mode |
| Invalid Password | Login With Invalid Credentials Should Fail | demo | invalid |
| Invalid User Name And Password | Login With Invalid Credentials Should Fail | invalid | whatever |
| Empty User Name | Login With Invalid Credentials Should Fail | mode | |
| Empty Password | Login With Invalid Credentials Should Fail | demo | \ |
| Empty User Name And Password | Login With Invalid Credentials Should Fail | \ |
Note that in the example above, column headers have been changed to match the data. This is possible, because on the first row other cells except the first one are ignored. Additionally, backslash is used for escaping empty cells at the end of the table.
Settings in the Test Case table
Test cases can also have their own settings. Setting names are always in the second column, where keywords normally are, and their values are in the subsequent columns. Setting names have square brackets around them to distinguish them from keywords. The available settings are listed below and explained later in this section.
- [Documentation]
- Used for specifying a test case documentation.
- [Tags]
- Used for tagging test cases.
- [Setup], [Teardown]
- Specify test setup and teardown. Have also synonyms [Precondition] and [Postcondition], respectively.
- [Timeout]
- Used for setting a test case timeout. Timeouts are discussed in their own section.
| Test Case | Action | Argument | Argument |
|---|---|---|---|
| Test With Settings | [Documentation] | Another dummy test | |
| [Tags] | dummy | owner-johndoe | |
| Log | Hello, world! |
2.2.2 Test case name and documentation
The test case name comes directly from the Test Case table: it is exactly what is entered into the test case column. Test cases in one test suite should have unique names. Pertaining to this, you can also use the automatic variable ${TEST_NAME} within the test itself to refer to the test name. It is available whenever a test is being executed, including all user keywords, as well as the test setup and the test teardown.
The [Documentation] setting allows you to set a free documentation for a test case. That text is shown in the command line output, as well as the resulting test logs and test reports. If the documentation is long, it can be split into several cells that are catenated together with spaces. It is possible to use simple HTML formatting and even variables can be used.
| Test Case | Action | Argument | Argument |
|---|---|---|---|
| Simple | [Documentation] | Simple documentation | |
| No Operation | |||
| Splitting | [Documentation] | This documentation is a bit longer and | it has been split into several columns. |
| No Operation | |||
| Formatting | [Documentation] | *This is bold*, _this italic_ and | here is a link: http://robotframework.org |
| No Operation | |||
| Variables | [Documentation] | Executed at ${HOST} by ${USER} | |
| No Operation |
It is important that test cases have clear and descriptive names, and in that case they normally do not need any documentation. If the logic of the test case needs documenting, it is often a sign that keywords in the test case need better names and they are to be enhanced, instead of adding extra documentation. Finally, metadata, such as the environment and user information in the last example above, is often better specified using tags.
2.2.3 Tagging test cases
Using tags in Robot Framework is a simple, yet powerful mechanism for classifying test cases. Tags are free text and they can be used at least for the following purposes:
- Tags are shown in test reports, logs and, of course, in the test data, so they provide metadata to test cases.
- Statistics about test cases (total, passed, failed are automatically collected based on tags.
- With tags, you can include or exclude test cases to be executed.
- With tags, you can specify which test cases are considered critical.
In this section it is only explained how to set tags for test cases, and different ways to do it are listed below. These approaches can naturally be used together.
- Force Tags in the Setting table
- All test cases in a test case file with this setting always get specified tags. If it is used in the test suite initialization file, all test cases in sub test suites get these tags.
- Default Tags in the Setting table
- Test cases that do not have a [Tags] setting of their own get these tags. If it used in the test suite initialization file, it is interpreted as a default value for Default Tags in lower-level test suites.
- [Tags] in the Test Case table
- A test case always gets these tags. Additionally, it does not get the possible tags specified with Default Tags.
- --settag command line option
- All executed test cases get tags set with this option in addition to tags they got elsewhere. This option is only available in Robot Framework version 1.8.3 and newer.
Tags are free text, but they are normalized so that they are converted to lowercase and all spaces are removed. If a test case gets the same tag several times, other occurrences than the first one are removed. Tags can be created using variables, assuming that those variables exist.
| Setting | Value | Value | Value |
|---|---|---|---|
| Force Tags | req-42 | ||
| Default Tags | owner-john | smoke |
| Variable | Value | Value | Value |
|---|---|---|---|
| ${HOST} | 10.0.1.42 |
| Test Case | Action | Argument | Argument |
|---|---|---|---|
| No own tags | [Documentation] | This test has tags | owner-john, smoke, req-42 |
| No Operation | |||
| With own tags | [Documentation] | This test has tags | not_ready, owner-mrx, req-42 |
| [Tags] | owner-mrx | not_ready | |
| No Operation | |||
| Own tags with variables | [Documentation] | This test has tags | host-10.0.1.42, req-42 |
| [Tags] | host-${HOST} | ||
| No Operation | |||
| Empty own tags | [Documentation] | This test has tags | req-42 |
| [Tags] | |||
| No Operation |
2.2.4 Test setup and teardown
Robot Framework has similar test setup and teardown functions as many other test automation frameworks. In short, a test setup is something that is executed before a test case and a test teardown is executed after a test case. What makes a test teardown special is that it is executed also when a test case fails, so it can be used for clean-up activities that must be done regardless of the test case status. Both a setup and a teardown can also easily be specified for all test cases in a test suite, so using them avoids repetition.
In Robot Framework, a test setup or teardown is just a normal keyword with possible arguments. It can either be a keyword from a library or a higher-level user keyword.
The easiest way to specify a setup or a teardown for test cases in a test suite is using the Test Setup and Test Teardown settings in the Setting table. Individual test cases can also have their own setup or teardown. They are defined with the [Setup] or [Teardown] settings in the test case table and they override possible Test Setup and Test Teardown settings. Having no keyword after a [Setup] or [Teardown] setting means having no setup or teardown.
| Setting | Value | Value | Value |
|---|---|---|---|
| Test Setup | Open Application | App A | |
| Test Teardown | Close Application |
| Test Case | Action | Argument | Argument |
|---|---|---|---|
| Default values | [Documentation] | Setup and teardown | from setting table |
| Do Something | |||
| Overridden setup | [Documentation] | Own setup, teardown | from setting table |
| [Setup] | Open Application | App B | |
| Do Something | |||
| No teardown | [Documentation] | Default setup, no | teardown at all |
| Do Something | |||
| [Teardown] | |||
| Using variables | [Documentation] | Setup and teardown | given as variables |
| [Setup] | ${SETUP} | ||
| Do Something | |||
| [Teardown] | ${TEARDOWN} |
Often when creating use-case-like test cases, the terms precondition and postcondition are preferred over the terms setup and teardown. Robot Framework supports also this terminology, so that a precondition is a synonym to a setup and a postcondition to a teardown.
| Test Setup | Test Precondition |
| Test Teardown | Test Postcondition |
| [Setup] | [Precondition] |
| [Teardown] | [Postcondition] |
The name of the keyword to be executed as a setup or a teardown can be a variable. This facilitates having different setups or teardowns in different environments by giving the keyword name as a variable from the command line.
Note
Test suites can have a setup and teardown of their own. A suite setup is executed before any test cases or sub test suites in that test suite, and similarly a suite teardown is executed after them.
2.3 Creating test suites
Robot Framework test cases are created in test case files, which can be organized into directories. These files and directories create a hierarchical test suite structure.
2.3.1 Test case files
Robot Framework test cases are created using test case tables in test case files. Such a file automatically creates a test suite from all the test cases it contains. There is no upper limit for how many test cases there can be, but it is recommended to have less than ten, unless the data-driven approach is used, where one test case consists of only one high-level keyword.
The following settings in the Setting table can be used to customize the test suite:
- Documentation
- Used for specifying a test suite documentation
- Meta: <name>
- Used for setting free test suite metadata.
- Suite Setup, Suite Teardown
- Specify suite setup and teardown. Have also synonyms Suite Precondition and Suite Postcondition, respectively.
2.3.2 Test suite directories
Test case files can be organized into directories, and these directories create higher-level test suites. A test suite created from a directory cannot have any test cases directly, but it contains other test suites with test cases, instead. These directories can then be placed into other directories creating an even higher-level suite. There are no limits for the structure, so test cases can be organized as needed.
When a test directory is executed, the files and directories it contains are processed recursively as follows:
- Files and folders with names starting with a dot (.) or an underscore (_) are ignored.
- Files with names not having the .html, .xhtml, .htm or .tsv extension (case-insensitive) are ignored.
- Directories with the name CVS (case-sensitive) are ignored.
- Other files and directories are processed.
The files and directories that are processed are expected to be test case files and test directories, respectively, but if they do not contain any test cases, they are silently ignored (a message is written to the syslog) and the processing continues.
Initialization files
A test suite created from a directory can have the same settings (Documentation, Meta: <name>, Suite Setup, Suite Teardown) as a test case created from a file. Because a directory alone cannot have that kind of information, they must be placed into a special initialization file.
Initialization files have the same structure as test case files, except that they cannot have test case tables, and the overall syntax used in them is the same as in other test data files. An initialization file name must always be of the format __init__.extension, where the extension is the same as normally for test data files (for example, __init__.html or __init__.tsv). The name format is borrowed from Python, where files named in this manner denote that a directory is a module.
The main usage of initialization files is setting test-suite-related settings, but setting test-case-related settings is also possible. However, only Force Tags is generally useful, because others are only default values for the same settings in lower-level files, and even they are default values for the settings in the Test Case table.
| Setting | Value | Value |
|---|---|---|
| Documentation | Example suite | |
| Suite Setup | Do Something | ${MESSAGE} |
| Force Tags | example | |
| Library | SomeLibrary |
| Variable | Value | Value |
|---|---|---|
| ${MESSAGE} | Hello, world! |
| Keyword | Action | Argument | Argument |
|---|---|---|---|
| Do Something | [Arguments] | ${arg} | |
| Log | ${arg} |
Note that variables and keywords created in initialization files are not available elsewhere. If there is a need to share them, for example, with lower-level test suites, resource files must be used.
2.3.3 Test suite name and documentation
The test suite name is got directly from the file or directory name, but a possible file extension is ignored. The name is created so that underscores are replaced with spaces, words in camelCaseFormat separated, and first letters of all words capitalized. For example, some_tests.html becomes Some Tests and MyTestDir becomes My Test Dir.
The documentation for a test suite is set using the Documentation setting in the Setting table. It can be used in test case files or, with higher-level suites, in test suite initialization files. Test suite documentation has exactly the same characteristics regarding to where it is shown and how it can be created as test case documentation.
| Setting | Value | Value | Value |
|---|---|---|---|
| Documentation | An example test suite | documentation with | *some* _formatting_. |
| ... | See test documentation | for more documentation | examples. |
Both the name and documentation of the top-level test suite can be overridden in test execution. This can be done with the command line options --name and --doc, respectively, as explained in section Setting metadata.
2.3.4 Free test suite metadata
Test suites can also have other metadata than the documentation. This metadata is defined in the Setting table using the Meta: <name> setting, where <name> is a freely selected metadata name. For example, Meta: Version adds the version metadata for a test suite. Metadata set in this manner is shown in test reports and logs.
The value for the metadata is located in the column after the name. It is handled similarly as documentations, which means that it can be split into several cells (joined together with spaces), simple HTML formatting works and even variables can be used.
| Setting | Value | Value | Value |
|---|---|---|---|
| Meta: Version | 2.0 | ||
| Meta: More Info | For more information | about *Robot Framework* | see http://robotframework.org |
| Meta: Executed At | ${HOST} |
For top-level test suites, it is possible to set metadata also with the --metadata command line option. This is discussed in more detail in section Setting metadata.
2.3.5 Suite setup and teardown
Not only test cases but also test suites can have a setup and a teardown. A suite setup is executed before running any of the suite's test cases or child test suites, and a test teardown is executed after them. All test suites can have a setup and a teardown; with suites created from a directory they must be specified in a test suite initialization file.
Similarly as with test cases, a suite setup and teardown are keywords that may take arguments. They are defined in the Setting table with Suite Setup and Suite Teardown settings, respectively. They also have similar synonyms, Suite Precondition and Suite Postcondition, as a test case setup and teardown have. Keyword names and possible arguments are located in the columns after the setting name.
If a suite setup fails, all test cases in it and its child test suites are immediately assigned a fail status and they are not actually executed. This makes suite setups ideal for checking preconditions that must be met before running test cases is possible.
A suite teardown is normally used for cleaning up after all the test cases have been executed. It is executed even if the setup of the same suite fails. If the suite teardown fails, all test cases in the suite are marked failed, regardless of their original execution status.
The name of the keyword to be executed as a setup or a teardown can be a variable. This facilitates having different setups or teardowns in different environments by giving the keyword name as a variable from the command line.
2.4 Using test libraries
Test libraries contain those lowest-level keywords, often called library keywords, which actually interact with the system under test. All test cases always use keywords from some library, often through higher-level user keywords. This section explains how to take test libraries into use and how to use the keywords they provide. Creating test libraries is described in a separate section.
2.4.1 Taking test libraries into use
Instructions for taking test libraries into use are given in the subsections below.
Using Library setting
Test libraries are normally imported using the Library setting in the Setting table and having the library name in the subsequent column. The library name is case-sensitive (it is the name of the module or class implementing the library and must be exactly correct), but any spaces in it are ignored. With Python libraries in modules or Java libraries in packages, the full name including the module or package name must be used. In those cases where the library needs arguments, they are listed in the columns after the library name. Both the library name and arguments can be set using variables.
| Setting | Value | Value | Value |
|---|---|---|---|
| Library | OperatingSystem | ||
| Library | com.company.TestLib | ||
| Library | MyLibrary | arg1 | arg2 |
| Library | ${LIBRARY} |
It is possible to import test libraries in test case files, resource files and test suite initialization files. In all these cases, all the keywords in the imported library are available in that file. With resource files, those keywords are also available in other files using them.
Using Import Library keyword
Another possibility to take a test library into use is using the keyword Import Library from the BuiltIn library. This keyword takes the library name and possible arguments similarly as the Library setting. Keywords from the imported library are available in the test suite where the Import Library keyword was used. This approach is useful in cases where the library is not available when the test execution starts and only some other keywords make it available.
| Test Case | Action | Argument | Argument | Argument |
|---|---|---|---|---|
| Example | Do Something | |||
| Import Library | MyLibrary | arg1 | arg2 | |
| KW From Mylibrary |
Library search path
Robot Framework can import a library only if the library class or module can be found from the library search path. Basically, this means that the library code and all its possible dependencies must be in PYTHONPATH or, when running tests on Jython, in a CLASSPATH. Setting the library search path is explained in a section of its own, and well-developed libraries either do that automatically or have clear instructions on how to do it.
2.4.2 Setting custom name to test library
The library name is shown in test logs before keyword names, and if multiple keywords have the same name, they must be used so that the keyword name is prefixed with the library name. The library name is got normally from the module or class name implementing it, but there are some situations where changing it is desirable:
- There is a need to import the same library several times with different arguments. This is not possible otherwise.
- The library name is inconveniently long. This can happen, for example, if a Java library has a long package name.
- You want to use variables to import different libraries in different environments, but refer to them with the same name.
- The library name is misleading or otherwise poor. In this case, changing the actual name is, of course, a better solution.
The basic syntax for specifying the new name is having the text WITH NAME (case-insensitive) after the library name and then having the new name in the next cell. The specified name is shown in logs and must be used in the test data when using keywords' full name (LibraryName.Keyword Name).
| Setting | Value | Value | Value |
|---|---|---|---|
| Library | com.company.TestLib | WITH NAME | TestLib |
| Library | ${LIBRARY} | WITH NAME | MyName |
Possible arguments to the library are placed into cells between the original library name and the WITH NAME text. The following example illustrates how the same library can be imported several times with different arguments:
| Setting | Value | Value | Value | Value | Value |
|---|---|---|---|---|---|
| Library | SomeLibrary | localhost | 1234 | WITH NAME | LocalLib |
| Library | SomeLibrary | server.domain | 8080 | WITH NAME | RemoteLib |
| Test Case | Action | Argument | Argument |
|---|---|---|---|
| My Test | LocalLib.Some Keyword | some arg | second arg |
| RemoteLib.Some Keyword | another arg | whatever | |
| LocalLib.Another Keyword |
Setting a custom name to a test library works both when importing a library in the Setting table and when using the Import Library keyword.
2.4.3 Standard libraries
Some test libraries are distributed with Robot Framework and these libraries are called standard libraries. These are the available standard libraries:
The BuiltIn library is special, because it is taken into use automatically and thus its keywords are always available. Other standard libraries need to be imported in the same way as any other libraries, but there is no need to install them. Additionally, they work when running tests both with Python and Jython (with the Screenshot library as an exception).
New standard libraries can, and will, be added in the future. If you have an idea for a new standard library, or even have one that could be incorporated immediately, please contact Robot Framework developers. In general, a library is a good candidate to be added into standard libraries if it is generic, works on both Python and Jython without any external dependencies, and is adequately tested and documented.
BuiltIn library
The BuiltIn library provides a set of generic keywords needed often. The provided keywords allow functions for verifications (for example, Should Be Equal), conversions (for example, Convert To Integer) and for various other purposes (for example, Log and Sleep).
The names of the keywords in the BuiltIn library have been renamed for Robot Framework version 1.8. All the old keywords still work, but the long names (the names visible in log files) of the keywords that are deprecated begin with DeprecatedBuiltIn. (for example, DeprecatedBuiltIn.Equals).
For more information, see the BuiltIn library documentation.
OperatingSystem library
The OperatingSystem library enables various operating-system-related tasks to be performed in the system running Robot Framework. It can, among other things, execute commands (for example, Run) and check whether files exist or not (for example, File Should Exist). The idea of the library is to wrap all relevant functions from the standard Python modules os, os.path and shutil, but other related functions can also be added.
The names of the keywords in the OperatingSystem library have been renamed for Robot Framework version 1.8. All the old keywords still work, but the long names (names visible in log files) of the keywords that are deprecated begin with DeprecatedOperatingSystem. (for example, DeprecatedOperatingSystem.Fail Unless File Empty).
For more information, see the OperatingSystem library documentation.
Telnet library
The Telnet library enables testing over a Telnet connection. It has functions for logging into a Telnet server, running commands on the server and returning the output. The Telnet library extends Python's own telnetlib module and it supports several simultaneous connections.
For more information, see the Telnet library documentation.
Collections library
The Collections library provides a set of keywords for handling Python's standard list and dictionary data structures. For more information about lists and dictionaries, see Python Library Reference . The provided keywords allow functions for creating dictionaries (Create Dictionary), modifying lists and dictionaries (for example, Append To List), and checking the equality of lists and dictionaries (for example, Dictionaries Should Be Equal).
For more information, see the Collections library documentation.
Screenshot library
The Screenshot library provides a way to capture and store screenshots of the whole desktop. This library is implemented with Java AWT APIs, so it can be used only when running Robot Framework with Jython.
For more information, see the Screenshot library documentation.
2.4.4 External libraries
Any test library that is not one of the standard libraries is, by definition, an external library. Robot Framework developers provide some generic libraries, such as SeleniumLibrary, which are not packaged with the framework itself, because they require external dependencies. Generic libraries can also be provided by other parties, and most teams have also some custom libraries only for themselves.
Different external libraries can have a totally different mechanism for installing and introducing them. Quite often they also require some other dependencies to be installed separately. All libraries should have clear instructions on this and preferably automate the installation.
2.5 Variables
2.5.1 Introduction
Variables are an integral feature of Robot Framework, and they can be used in most places in test data. Most commonly, they are used in arguments for keywords in test case tables and keyword tables, but also all settings allow variables in their values. A normal keyword name cannot be specified with a variable, but the BuiltIn keyword Run Keyword can be used to get the same effect.
Robot Framework itself has two kinds of variables, scalars and lists, and they have the syntaxes ${VARIABLE} and @{VARIABLE}, respectively. In addition to this, environment variables can be used directly with the syntax %{VARIABLE}.
The use of variables is recommended in the following cases:
- When strings change often in the test data. With variables you only need to make these changes in one place.
- When creating system-independent and operating-system-independent test data. Using variables instead of hard-coded strings eases that considerably (for example, ${RESOURCES} instead of c:\resources, or ${HOST} instead of 10.0.0.1:8080). Because variables can be set from the command line when tests are started, changing system-specific variables is easy (for example, --variable HOST:192.168.0.12 --variable RESOURCES:/opt/resources). This also facilitates localization testing, which often involves running the same tests with different strings.
- When there is a need to have objects other than strings as arguments for keywords.
- When different keywords, even in different test libraries, need to communicate. You can assign a return value from one keyword to a variable and give that as an argument to another.
- When values in the test data are long or otherwise complicated. For example, ${URL} is shorter than http://long.domain.name:8080/path/to/service?foo=1&bar=2&zap=42.
If a nonexistent variable is used in the test data, the keyword using it fails. If the same syntax that is used for variables is needed as a literal string, it must be escaped with a backslash as in \${NAME}.
2.5.2 Variable types
Different variable types are briefly described in this section. The creation and usage of variables is described in more detail in the following subsections.
Robot Framework variables, similarly as keywords, are case-insensitive, and also spaces and underscores are ignored. However, it is recommended to use all capital letters with global variables (for example, ${PATH} or ${TWO_WORDS}) and small letters with variables that are only available in certain test cases or user keywords (for example, ${my_var} or ${myVar}). What is even more important is that cases are used consistently.
Unlike in some programming languages where similar variable syntax is used, curly braces ("{" and "}") are mandatory in Robot Framework test data. Basically, variable names can have any characters between the curly braces. However, using only alphabetic characters (from a to z), numbers (from 0 to 9), underscore and space is recommended, and it is even a requirement for using extended variable syntax.
Scalar variables
When scalar variables are used in the test data, they are replaced with the value they are assigned to. While scalar variables are most commonly used for simple strings, you can assign any objects, including lists, to them. The scalar variable syntax, for example ${NAME}, should be familiar to most users, as it is also used, for example, in shell scripts and Perl.
The example below illustrates the usage of scalar variables. Assuming that the variables ${GREET} and ${NAME} are available and assigned to strings Hello and world, respectively, both the example test cases are equivalent.
| Test Case | Action | Argument | Argument |
|---|---|---|---|
| Strings | Log | Hello | |
| Log | Hello, world!! | ||
| Variables | Log | ${GREET} | |
| Log | ${GREET}, ${NAME}!! |
When a scalar variable is used as the only value in a test data cell, the scalar variable is replaced with the value it has. The value may be any object. When a scalar variable is used in a test data cell with anything else (constant strings or other variables), its value is first converted into a string and then catenated to whatever is in that cell. Converting the value into a string means that the object's method =__str__ (in Python) or toString (in Java) is called.
The example below demonstrates the difference between having a variable in a cell alone or with other content. First, let us assume that we have a variable ${STR} set to a string Hello, world! and ${OBJ} set to an instance of the following Java object:
public class MyObj {

    public String toString() {
        return "Hi, tellus!";
    }
}
With these two variables set, we then have the following test data:
| Test Case | Action | Argument | Argument |
|---|---|---|---|
| Objects | KW 1 | ${STR} | |
| KW 2 | ${OBJ} | ||
| KW 3 | I said "${STR}" | ||
| KW 4 | You said "${OBJ}" |
Finally, when this test data is executed, different keywords receive the arguments as explained below:
- KW 1 gets a string Hello, world!
- KW 2 gets an object stored to variable ${OBJ}
- KW 3 gets a string I said "Hello, world!"
- KW 4 gets a string You said "Hi, tellus!"
List variables
List variables are compound variables that can have several values assigned to them. In short, they are always lists and can contain an unlimited number of entries (also empty lists are possible). The main benefit of list variables is that they allow you to assign a name for a larger data set. While list variables normally contain only strings, other content is also possible.
When you use a list variable in test data, then the cell that contains the variable is replaced with the content of the variable. Thus, if the list variable contains two elements, the cell containing the list variable is turned into two cells with the content of the list variable. Note that cells with list variables should not contain other content. The list variable syntax, @{NAME}, is borrowed from Perl.
Assuming that the list variable @{USER} is set to the value ['robot','secret'], the following two test cases are equivalent.
| Test Case | Action | Argument | Argument |
|---|---|---|---|
| Strings | Login | robot | secret |
| List Variable | Login | @{USER} |
It is also possible to access a certain value from the list variable with the syntax @{NAME}[i], where "i" is the index of the selected value. Indexes start from zero, and trying to access a value with too large an index causes an error. List items accessed in this manner can be used similarly as scalar variables.
| Test Case | Action | Argument | Argument |
|---|---|---|---|
| Strings | Login | robot | secret |
| Title Should Be | Welcome robot! | ||
| List Variable | Login | @{USER} | |
| Title Should Be | Welcome @{USER}[0]! |
Environment variables
Robot Framework allows using environment variables in the test data using the syntax %{ENV_VAR_NAME}. They are limited to string values.
Environment variables set in the system before the test execution are available during it, and it is possible to create new ones with the keyword Set Environment Variable or delete existing ones with the keyword Delete Environment Variable, both available in the OperatingSystem library. Because environment variables are global, environment variables set in one test case can be used in other test cases executed after it. However, changes to environment variables are not effective after the test execution.
| Test Case | Action | Argument | Argument |
|---|---|---|---|
| Env Variables | Log | Current user: %{USER} | |
| Run | %{JAVA_HOME}${/}javac |
2.5.3 Creating variables
Variables can spring into existence from different sources as described in the subsections below.
Variable table
The most common source for variables are Variable tables in test case files and resource files. Variable tables are convenient, because they allow creating variables in the same place as the rest of the test data, and the needed syntax is very simple. Their main disadvantage is that they only enable assigning variables into strings or a list of strings. If other value types are needed, variable files are probably a better option.
Creating scalar variables
The simplest possible variable assignment is setting a string into a scalar variable. This is done by giving the variable name (including ${}) in the first column of the Variable table and the value in the second one. If the second column is empty, an empty string is set as a value. Also an already defined variable can be used in the value.
| Variable | Value | Value |
|---|---|---|
| ${NAME} | Robot Framework | |
| ${VERSION} | 2.0 | |
| ${EMPTY} | ||
| ${ROBOT} | ${NAME} ${VERSION} |
Since Robot Framework version 1.8, it is possible, but not obligatory, to use the equals sign = after the variable name to make assigning variables slightly more explicit.
| Variable | Value | Value |
|---|---|---|
| ${NAME} = | Robot Framework | |
| ${VERSION} = | 2.0 |
Creating list variables
Creating list variables is as easy as creating scalar variables. Again, the variable name is in the first column of the Variable table and values in the subsequent columns. A list variable can have any number of values, starting from zero, and if many values are needed, they can be split into several rows.
| Variable | Value | Value | Value |
|---|---|---|---|
| @{NAMES} | Matti | Teppo | |
| @{EMPTY} | |||
| @{NAMES2} | @{NAMES} | @{EMPTY} | Seppo |
| @{MANY} | one | two | three |
| ... | four | five | six |
| ... | seven |
Variable file
Variable files are the most powerful mechanism for creating different kind of variables. It is possible to assign variables to any object using them, and they also enable creating variables dynamically. The variable file syntax and taking variable files into use is explained in section Resource and variable files.
Setting variables in command line
Variables can be set from the command line either individually with the --variable option or using a variable file with the --variablefile option. Variables set from the command line are globally available for all executed test data files, and they also override variables with the same names in the Variable table and in the imported variable files.
The syntax for setting individual variables is --variable name:value, where name is the name of the variable without ${} and value is its value. Several variables can be set by using this option several times. Only scalar variables can be set from the command line and they can only get string values. Many special characters are difficult or impossible to represent in the command line, but they can be escaped with the --escape option.
--variable EXAMPLE:value
--variable HOST:localhost:7272 --variable USER:robot
--variable ESCAPED:Qquotes_and_spacesQ --escape quot:Q --escape space:_
In the examples above, variables are set so that
- ${EXAMPLE} gets the value value
- ${HOST} and ${USER} get the values localhost:7272 and robot
- ${ESCAPED} gets the value "quotes and spaces"
Variable files are given from the command line using the syntax --variablefile path/to/variables.py. Which variables actually are created depends on which variables there are in the referenced variable file. If both variable files and individual variables are given from the command line, the latter override possible variables with the same name in the variable files.
Return values from keywords
Return values from keywords can also be set into variables. This allows communication between different keywords even in different test libraries. The syntax for a simple case is illustrated in the example below:
| Test Case | Action | Argument | Argument |
|---|---|---|---|
| Returning | ${x} = | Get X | an argument |
| Log | We got ${x}! |
In the example above, the value returned by the Get X keyword is first set into the variable ${x} and then used by the Log keyword. This syntax works in all cases where a keywords returns something, and the variable is set to whatever value returned by the keyword. Having the equals sign = after the variable name is not obligatory, but recommended, because it makes the assignment more explicit.
If a keyword returns a list, it is also possible to set it into several scalar variables or into a list variable. This is possible with keywords returning Python lists or tuples or, from Robot Framework version 1.8.6 onwards, with Java keywords returning an array. In the future, it is possible to add support also for other iterables, if needed.
| Test Case | Action | Argument | Argument | Argument |
|---|---|---|---|---|
| Return Multiple | ${scalar} = | Get 3 | ||
| ${a} | ${b} | ${c}= | Get 3 | |
| ${first} | @{rest} = | Get 3 | ||
| @{list} = | Get 3 |
Assuming that the keyword Get 3 returns a list [1, 2, 3], the following variables are created:
- ${scalar} with the value [1, 2, 3]
- ${a}, ${b} and ${c} with the values 1, 2, and 3, respectively
- ${first} with the value 1, and @{rest} with the value [2, 3]
- @{list} with the value [1, 2, 3]
Variables set in this manner are otherwise similar to any other variables, but they are available only within the scope of the test case or keyword where they are created. Thus it is not possible, for example, to set a variable in one test case and use it in another. This is because, in general, automated test cases should not depend on each other, and accidentally setting a variable that is used elsewhere could cause hard-to-debug errors. If there is a genuine need for setting a variable in one test case and using it in another, use the Set Suite Variable or Set Global Variable keywords available from the BuiltIn library.
Variable scopes
Depending on where and how they are created, variables can have a global, test suite, test case or user keyword scope.
Global scope
Global variables are available everywhere in the test data. These variables are normally set from the command line with the --variable and --variablefile options. Additionally, it is possible to create new global variables or change the existing ones with the BuiltIn keyword Set Global Variable anywhere in the test data.
Global variables override variables defined in Variable tables or in imported variable files. Variables set locally override even global variables, but only in that local scope. It is recommended to use capital letters with global variables.
Test suite scope
Variables with the test suite scope are available anywhere in the test suite where they are defined or imported. They can be created in Variable tables, imported from variable files using the Variables setting in the Setting table, or set with the BuiltIn keyword Set Suite Variable anywhere in that test suite.
The test suite scope is not recursive, which means that variables available in a higher-level test suite are not available in lower-level suites. If necessary, resource and variable files can be used for sharing variables.
Since these variables can be considered global in the test suite where they are used, it is recommended to use capital letters also with them.
Test case scope
Variables created in test cases from the return values of keywords have a test case scope and they are available only in that test case. Another possibility to create them is using the BuiltIn keyword Set Test Variable anywhere in that particular test case. Test case variables are local and should use lower-case letters.
User keyword scope
User keywords get their own variables from arguments passed to them and return values from the keywords they use. Also these variables are local and should use lower-case letters.
2.5.4 Built-in variables
Robot Framework provides some built-in variables that are available automatically.
Operating-system variables
Built-in variables related to the operating system ease making the test data operating-system-agnostic.
| Variable | Explanation |
|---|---|
| ${CURDIR} | An absolute path to the directory where the test data file is located. This variable is case-sensitive. |
| ${TEMPDIR} | An absolute path to the system temporary directory. In UNIX-like systems this is typically /tmp, and in Windows c:\Documents and Settings\<user>\Local Settings\Temp. |
| ${/} | The system directory path separator. / in UNIX-like systems, \ in Windows. |
| ${:} | The system path element separator. : in UNIX-like systems and ; in Windows. |
| Test Case | Action | Argument | Argument |
|---|---|---|---|
| Example | Create File | ${CURDIR}${/}input.data | Some text here |
| Set Environment Variable | CLASSPATH | ${TEMPDIR}${:}${TEMPDIR}${/}foo.jar |
Number variables
The variable syntax can be used for creating both integers and floating point numbers, as illustrated in the example below. This is useful when a keyword expects to get a real number as an argument.
| Test Case | Action | Argument | Argument | Comment |
|---|---|---|---|---|
| Example 1A | Connect | example.com | 80 | # Connect gets two strings as arguments |
| Example 1B | Connect | example.com | ${80} | # Connect gets a string and an integer |
| Example 2 | Do X | ${3.14} | ${-1e-4} | # Do X gets floating point numbers 3.14 and -0.0001 |
Boolean and None/null variables
Also Boolean values and Python None and Java null can be created using the variable syntax similarly as numbers.
| Test Case | Action | Argument | Argument | Comment |
|---|---|---|---|---|
| Boolean | Set Status | ${true} | # Set Status gets Boolean true as an argument | |
| Create Y | something | ${false} | # Create Y gets a string and Boolean false | |
| None | Do XYZ | ${None} | # Do XYZ gets Python None as an argument | |
| Null | ${ret} = | Get Value | arg | # Checking that Get Value returns Java null |
| Should Be Equal | ${ret} | ${null} |
These variables are case-insensitive, so for example ${True} and ${true} are equivalent. Additionally, ${None} and ${null} are synonyms, because when running tests on the Jython interpreter, Jython automatically converts None and null to the correct format when necessary.
Automatic variables
Some automatic variables can also be used in the test data. These variables can have different values during the test execution and some of them are not even available all the time.
| Variable | Explanation | Available |
|---|---|---|
| ${TEST_NAME} | The name of the current test case. | Test case |
| @{TEST_TAGS} | Contains the tags of the current test case in alphabetical order. | Test case |
| ${TEST_STATUS} | The status of the current test case, either PASS or FAIL. | Test teardown |
| ${TEST_MESSSAGE} | The possible error message of the current test case. | Test teardown |
| ${PREV_TEST_NAME} | The name of the previous test case, or an empty string if no tests have been executed yet. | Everywhere |
| ${PREV_TEST_STATUS} | The status of the previous test case: either PASS, FAIL or an empty string when no tests have been executed. | Everywhere |
| ${PREV_TEST_MESSSAGE} | The possible error message of the previous test case. | Everywhere |
| ${SUITE_NAME} | The full name of the current test suite. | Everywhere |
| ${SUITE_STATUS} | The status of the current test case, either PASS or FAIL. | Suite teardown |
| ${SUITE_MESSAGE} | The full message of the current test suite, including statistics. | Suite teardown |
| ${OUTPUT_FILE} | An absolute path to the current output file. Has different values during execution when outputs are split. | Everywhere |
| ${LOG_FILE} | An absolute path to the current log file or NONE when no log file is created. Has different values during execution when outputs are split. | Everywhere |
| ${REPORT_FILE} | An absolute path to the report file or NONE when no report is created. | Everywhere |
| ${SUMMARY_FILE} | An absolute path to the summary file or NONE when no summary is created. | Everywhere |
| ${DEBUG_FILE} | An absolute path to the debug file or NONE when no debug file is created. | Everywhere |
| ${OUTPUT_DIR} | An absolute path to the output directory. | Everywhere |
2.5.5 Advanced variable features
There are also some advanced variable features, described in this section.
Extended variable syntax
Extended variable syntax can be used with objects set into scalar variables. This allows accessing the attributes of the object (for example, ${obj.name} or ${obj.some_attr}), and even calling its methods (for example, ${obj.get_name()} or ${obj.getSomething('arg')}.
Extended variable syntax is a powerful feature, but it should be used with care. Accessing attributes is normally not a problem, on the contrary, as one variable with an object having several attributes is often better than having several variables. On the other hand, calling methods, especially when they are used with arguments, can make the test data complicated. If that happens, it is recommended to move the code into a test library.
The most common usages of extended variable syntax are illustrated in the example below. First assume that we have the following variable file and test case:
class MyObject:

    def __init__(self, name):
        self.name = name

    def greet(self, who):
        return '%s says hello to %s' % (self.name, who)

    def __str__(self):
        return self.name

OBJECT = MyObject('Robot')
DICTIONARY = { 1: 'one', 2: 'two', 3: 'three'}
| Test Case | Action | Argument | Argument |
|---|---|---|---|
| Example | KW 1 | ${OBJECT.name} | |
| KW 2 | ${OBJECT.greet('Fit')} | ||
| KW 3 | ${DICTIONARY[2]} |
When this test data is executed, the keywords get the arguments as explained below:
- KW 1 gets string Robot
- KW 2 gets string Robot says hello to Fit
- KW 3 gets string two
The extended variable syntax is evaluated in the following order:
- The variable is searched using the full variable name. The extended variable syntax is evaluated only, if no matching variable is found.
- The real name of the base variable is created. The body of the name consists of all the characters after ${ until the first occurrence of a non-alphanumeric character or a space (for example, OBJECT in ${OBJECT.name} and DICTIONARY in ${DICTIONARY[2]}).
- A variable matching the body is searched. If there is no match, an exception is raised and the test case fails.
- The expression inside the curly brackets is evaluated as a Python expression, so the base variable name is replaced with its value. If the evaluation fails because of an invalid syntax or that the queried attribute does not exist, an exception is raised and the test fails.
- The whole extended variable is replaced with the value returned from the evaluation.
If the object that is used is implemented with Java, the extended variable syntax allows you to access attributes using so-called bean properties. In essence, this means that if you have an object with the getName method set into a variable ${OBJ}, then the syntax ${OBJ.name} is equivalent to, but clearer than ${OBJ.getName()}. Thus the Python object used in the previous example could be replaced with the following Java implementation:
public class MyObject:

    private String name;

    public MyObject(String name) {
        name = name;
    }

    public String getName() {
        return name;
    }

    public String greet(String who) {
        return name + " says hello to " + who;
    }

    public String toString() {
        return name;
    }
}
Variables inside variables
Variables are allowed also inside variables, and when this syntax is used, variables are resolved from the inside out. For example, if you have a variable ${var${x}}, then ${x} is resolved first. If it has the value name, the final value is then the value of the variable ${varname}. There can be several nested variables, but resolving the outermost fails, if any of them does not exist.
In the example below, Do X gets the value ${JOHN_HOME} or ${JANE_HOME}, depending on if Get Name returns john or jane. If it returns something else, resolving ${${name}_HOME} fails.
| Variable | Value | Value | Value |
|---|---|---|---|
| ${JOHN_HOME} | /home/john | ||
| ${JANE_HOME} | /home/jane |
| Test Case | Action | Argument | Argument |
|---|---|---|---|
| Example | ${name} = | Get Name | |
| Do X | ${${name}_HOME} |
2.6 Creating user keywords
Keyword tables are used to create new higher-level keywords by combining existing keywords together. These keywords are called user keywords to differentiate them from lowest level library keywords that are implemented in test libraries. The syntax for creating user keywords is very close to the syntax for creating test cases, which makes it easy to learn.
2.6.1 User keyword syntax
Basic syntax
In many ways, the overall user keyword syntax is identical to the test case syntax. User keywords are created in keyword tables which differ from test case tables only by the name that is used to identify them. User keyword names are in the first column similarly as test cases names. Also user keywords are created from keywords, either from keywords in test libraries or other user keywords. Keyword names are normally in the second column, but when setting variables from keyword return values, they are in the subsequent columns.
| Keyword | Action | Argument | Argument |
|---|---|---|---|
| Open Login Page | Open Browser | http://host/login.html | |
| Title Should Be | Login Page | ||
| Title Should Start With | [Arguments] | ${expected} | |
| ${title} = | Get Title | ||
| Should Start With | ${title} | ${expected} |
Most user keywords take some arguments. This important feature is used already in the second example above, and it is explained in detail later in this section, similarly as user keyword return values.
User keywords can be created in test case files, resource files, and test suite initialization files. Keywords created in resource files are available for files using them, whereas other keywords are only available in the files where they are created.
Settings in the Keyword table
User keywords can have similar settings as test cases, and they have the same square bracket syntax separating them from keyword names. All available settings are listed below and explained later in this section.
- [Documentation]
- Used for setting a user keyword documentation.
- [Arguments]
- Specifies user keyword arguments.
- [Return]
- Specifies user keyword return values.
- [Timeout]
- Sets the possible user keyword timeout. Timeouts are discussed in a section of their own.
2.6.2 User keyword name and documentation
The user keyword name is defined in the first column of the user keyword table. Of course, the name should be descriptive, and it is acceptable to have quite long keyword names. Actually, when creating use-case-like test cases, the highest-level keywords are often formulated as sentences or even paragraphs.
User keywords can have a documentation that is set with the [Documentation] setting, exactly as test case documentation. This setting documents the user keyword in the test data. It is also shown in a more formal keyword documentation, which the libdoc tool can create from resource files. Finally, the first row of the documentation, everything until the first n sequence, is shown as a keyword documentation in test logs.
2.6.3 User keyword arguments
Most user keywords need to take some arguments. The syntax for specifying them is probably the most complicated feature normally needed with Robot Framework, but even that is relatively easy, particularly in most common cases. Arguments are always specified with the [Arguments] setting, and argument names use the same syntax as variables, for example ${arg}.
Positional arguments
The simplest way to specify arguments (apart from not having them at all) is using only positional arguments. In most cases, this is all that is needed.
The syntax is such that first the [Arguments] setting is given and then argument names are defined in the subsequent cells. Each argument is in its own cell, using the same syntax as with variables. The keyword must be used with as many arguments as there are argument names in its signature. Argument names should be descriptive, but the actual value is not important. It is recommended to use lower-case letters in variable names, either as ${my_arg} or ${myArg}.
| Keyword | Action | Argument | Argument | Argument |
|---|---|---|---|---|
| One Argument | [Arguments] | ${arg_name} | ||
| Log | Got argument ${arg_name} | |||
| Three Arguments | [Arguments] | ${arg1} | ${arg2} | ${arg3} |
| Log | 1st argument: ${arg1} | |||
| Log | 2nd argument: ${arg2} | |||
| Log | 3rd argument: ${arg3} |
Default values
Positional arguments are probably sufficient in most situations. However, sometimes it is useful to be able to have a keyword that takes a different number of arguments and has default values for those that are not given. Also user keywords allow this, and the needed new syntax does not add very much to the already discussed basic syntax. In short, default values are added to arguments, so that first there is the equals sign ( =) and then the value, for example ${arg}=default. There can be many arguments with defaults, but they all must be given after the normal positional arguments.
| Keyword | Action | Argument | Argument |
|---|---|---|---|
| One Argument With Default Value | [Arguments] | ${arg}=default value | |
| [Documentation] | This keyword takes | 0-1 arguments | |
| Log | Got argument ${arg} | ||
| Two Arguments With Defaults | [Arguments] | ${arg1}=default 1 | ${arg2}=default 2 |
| [Documentation] | This keyword takes | 0-2 arguments | |
| Log | 1st argument ${arg1} | ||
| Log | 2nd argument ${arg2} | ||
| One Required And One With Default | [Arguments] | ${required} | ${optional}=default |
| [Documentation] | This keyword takes | 1-2 arguments | |
| Log | Required: ${required} | ||
| Log | Optional: ${optional} |
As all Pythonistas must have already noticed, the syntax for specifying default arguments is heavily inspired by Python syntax for function default values.
Variable number of arguments
Sometimes, but more and more seldom, even default values are not enough and there is a need for a keyword accepting any number of arguments. User keywords support also this. All that is needed is having list variables such as @{varargs} as the last argument in the keyword signature. This syntax can be combined with the previously described positional arguments and default values, and at the end the list variable gets all the leftover arguments that do not match other arguments. The list variable can thus have any number of items, even zero.
| Keyword | Action | Argument | Argument | Argument |
|---|---|---|---|---|
| Any Number Of Arguments | [Arguments] | @{varargs} | ||
| Log Many | @{varargs} | |||
| One Or More Arguments | [Arguments] | ${required} | @{rest} | |
| Log Many | ${required} | @{rest} | ||
| Required, Default, Varargs | [Arguments] | ${req} | ${opt}=42 | @{others} |
| Log | Required: ${req} | |||
| Log | Optional: ${opt} | |||
| Log | Others: | |||
| : FOR | ${item} | IN | @{others} | |
| Log | ${item} |
The last example above illustrates how a variable number of arguments accepted by a user keyword can be used in a For loops. This combination of two rather advanced functions can sometimes be very useful.
Again, Pythonistas probably notice that the varargs syntax is very close to the one in Python.
2.6.4 User keyword return values
Similarly as library keywords, also user keywords can return values. Return values are defined with the [Return] setting. The values can then be assigned to variables in test cases or other user keywords.
In a typical case, a user keyword returns one value and it can be set to a scalar variable. This is done by having the return value in the next cell after the [Return] setting. User keywords can also return several values, which can then be assigned into several scalar variables at once, to a list variable, or to scalar variables and a list variable. Several values can be returned simply by specifying those values in different cells after the [Return] setting.
| Test Case | Action | Argument | Argument | Argument |
|---|---|---|---|---|
| One Return Value | ${ret} = | Return One Value | argument | |
| Some Keyword | ${ret} | |||
| Multiple Values | ${a} | ${b} | ${c} = | Return Three Values |
| @{list} = | Return Three Values | |||
| ${scalar} | @{rest} = | Return Three Values |
| Keyword | Action | Argument | Argument | Argument |
|---|---|---|---|---|
| Return One Value | [Arguments] | ${arg} | ||
| Do Something | ${arg} | |||
| ${value} = | Get Some Value | |||
| [Return] | ${value} | |||
| Return Three Values | [Return] | foo | bar | zap |
2.7 Resource and variable files
User keywords and variables in test case files and test suite initialization files can only be used in files where they are created, but resource files provide a mechanism for sharing them. Since the resource file structure is very close to test case files, it is easy to create them.
Variable files provide a powerful mechanism for creating and sharing variables. For example, they allow values other than strings and enable creating variables dynamically. Their flexibility comes from the fact that they are created using Python code, which also makes them somewhat more complicated than Variable tables.
2.7.1 Resource files
Taking resource files into use
Resource files are imported using the Resource setting in the Settings table. The path to the resource file is given in the cell after the setting name.
If the path is given in an absolute format, it is used directly. In other cases, the resource file is first searched relatively to the directory where the importing file is located. If the file is not found there, it is then searched from the directories in PYTHONPATH. The path can contain variables, and it is recommended to use them to make paths system-independent (for example, ${RESOURCES}/login_resources.html or ${RESOURCE_PATH}). Additionally, slashes ("/") in the path are automatically changed to backslashes ("\") on Windows.
| Setting | Value | Value |
|---|---|---|
| Resource | myresources.html | |
| Resource | ../data/resources.html | |
| Resource | ${RESOURCES}/common.tsv |
The user keywords and variables defined in a resource file are available in the file that takes that resource file into use. Similarly available are also all keywords and variables from the libraries, resource files and variable files imported by the said resource file.
Resource file structure
The higher-level structure of resource files is the same as that of test case files otherwise, but, of course, they cannot contain Test Case tables. Additionally, the Setting table in resource files can contain only import settings (Library, Resource, and Variables). The Variable table and Keyword table are used exactly the same way as in test case files.
If several resource files have a user keyword with the same name, they must be used so that the keyword name is prefixed with the resource file name without the extension (for example, myresources.Some Keyword and common.Some Keyword). Moreover, if several resource files contain the same variable, the one that is imported first is taken into use.
| Setting | Value | Value | Value |
|---|---|---|---|
| Library | SeleniumLibrary | ||
| Resource | ${RESOURCES}/common.html |
| Variable | Value | Value | Value |
|---|---|---|---|
| ${HOST} | localhost:7272 | ||
| ${LOGIN_URL} | http://${HOST}/ | ||
| ${WELCOME_URL} | http://${HOST}/welcome.html | ||
| ${BROWSER} | Firefox |
| Keyword | Action | Argument | Argument | Argument |
|---|---|---|---|---|
| Open Login Page | Open Browser | ${LOGIN_URL} | ${BROWSER} | |
| Title Should Be | Login Page | |||
| Input Name | [Arguments] | ${name} | ||
| Input Text | username_field | ${name} | ||
| Input Password | [Arguments] | ${password} | ||
| Input Text | password_field | ${password} |
2.7.2 Variable files
Variable files contain variables that can be used in test data. Variables can also be created using variable tables or set from the command line, but variable files allow creating them dynamically and their variables can contain any objects.
Variable files are created using the Python code, and technically they are Python modules. There are two different possibilities for creating variables:
- Creating variables directly
- Variables are specified as module attributes. In simple cases, the syntax is so simple that no real programming is needed. For example, MY_VAR = 'my value' creates a variable ${MY_VAR} with the specified text as the value.
- Getting variables from a special function
- Alternatively, variable files can have a special get_variables (or getVariables) method that returns variables as a Python dictionary. This method can even take arguments, which makes this approach quite flexible.
Taking variable files into use
Setting table
All test data files can import variables using the Variables setting in the Setting table, in the same way as resource files are imported using the Resource setting. Similarly to resource files, the path to the imported variable file is considered relative to the directory where the importing file is, and if not found, it is searched from the directories in PYTHONPATH. The path can also contain variables, and slashes are converted to backslashes on Windows.
The path to the variable file is given in the same way regardless of how the file is implemented. If the get_variables function is used and it takes arguments, those arguments are specified in the cells after the path and also they can contain variables.
| Setting | Value | Value | Value |
|---|---|---|---|
| Variables | myvariables.py | ||
| Variables | ../data/variables.py | ||
| Variables | ${RESOURCES}/common.py | ||
| Variables | taking_arguments.py | arg1 | ${ARG2} |
All variables from a variable file are available in the test data file that imports it. If several variable files are imported and they contain a variable with the same name, the one in the earliest imported file is taken into use. Additionally, variables created in Variable tables and set from the command line override variables from variable files.
Command line
Another way of introducing variables is using the command line option --variablefile. Variables in these files are globally available in all test data files, similarly as individual variables set with the --variable option.
For more information, see Robot command line options.
Creating variables directly
Basic syntax
When variable files are taken into use, they are imported as Python modules and all their global attributes that do not start with an underscore (_) are considered to be variables. Because variable names are case-insensitive, both lower- and upper-case names are possible, but in general, capital letters are recommended for global variables and attributes.
VARIABLE = "An example string"
ANOTHER_VARIABLE = "This is pretty easy!"
INTEGER = 42
STRINGS = ["one", "two", "kolme", "four"]
NUMBERS = [1, INTEGER, 3.14]
In the example above, variables ${VARIABLE}, ${ANOTHER_VARIABLE}, and so on, are created. The first two variables are strings, the third one is an integer and the last two are lists. All these variables are scalar variables, even the ones containing lists as values. To create list variables, the variable name must be prefixed with LIST__ (note the two underscores).
LIST__STRINGS = ["list", "of", "strings"]
LIST__MIXED = ["first value", -1.1, None, True]
The variables in both the examples above could be created also using the Variable table below.
| Variable | Value | Value | Value | Value |
|---|---|---|---|---|
| ${VARIABLE} | An example string | |||
| ${ANOTHER_VARIABLE} | This is pretty easy! | |||
| ${INTEGER} | ${42} | |||
| ${STRINGS} | one | two | kolme | four |
| ${NUMBERS} | ${1} | ${INTEGER} | ${3.14} | |
| @{STRINGS} | list | of | strings | |
| @{MIXED} | first value | ${-1.1} | ${None} | ${True} |
Using objects as values
Variables in variable files are not limited to having only strings or other base types as values like variable tables. Instead, their variables can contain any objects. In the example below, the variable ${MAPPING} contains a Java hashtable with two values (this example works only when running tests on Jython).
from java.util import Hashtable

MAPPING = Hashtable()
MAPPING.put("one", 1)
MAPPING.put("two", 2)
The second example creates ${MAPPING} as a Python dictionary and also has two variables created from a custom object implemented in the same file.
MAPPING = { 'one': 1, 'two': 2}

class MyObject:
    def __init__(self, name):
        self.name = name

OBJ1 = MyObject('John')
OBJ2 = MyObject('Jane')
Creating variables dynamically
Because variable files are created using a real programming language, they can have dynamic logic for setting variables.
import os
import random
import time

USER = os.getlogin()                # current login name
RANDOM_INT = random.randint(0, 10)  # random integer in range [0,10]
CURRENT_TIME = time.asctime()       # timestamp like 'Thu Apr  6 12:45:21 2006'
if time.localtime()[3] > 12:
    AFTERNOON = True
else:
    AFTERNOON = False
The example above uses standard Python libraries to set different variables, but you can use your own code to construct the values. The example below illustrates the concept, but similarly, your code could read the data from a database, from an external file or even ask it from the user.
import math

def get_area(diameter):
    radius = diameter / 2
    area = math.pi * radius * radius
    return area

AREA1 = get_area(1)
AREA2 = get_area(2)
Selecting which variables to include
When Robot Framework processes variable files, all their attributes that do not start with an underscore are expected to be variables. This means that even functions or classes created in the variable file or imported from elsewhere are considered variables. For example, the last example would contain the variables ${math} and ${get_area} in addition to ${AREA1} and ${AREA2}.
Normally the extra variables do not cause problems, but they could override some other variables and cause hard-to-debug errors. One possibility to ignore other attributes is prefixing them with an underscore:
import math as _math

def _get_area(diameter):
    radius = diameter / 2.0
    area = _math.pi * radius * radius
    return area

AREA1 = _get_area(1)
AREA2 = _get_area(2)
If there is a large number of other attributes, instead of prefixing them all, it is often easier to use a special attribute __all__ and give it a list of attribute names to be processed as variables.
import math

__all__ = ['AREA1', 'AREA2']

def get_area(diameter):
    radius = diameter / 2.0
    area = math.pi * radius * radius
    return area

AREA1 = get_area(1)
AREA2 = get_area(2)
Note
The __all__ attribute is also, and originally, used by Python to decide which attributes to import when using the syntax from modulename import *.
Getting variables from a special function
An alternative syntax for getting variables is having a special get_variables function (also camelCase syntax getVariables is possible) in the variable file. In this case, Robot Framework calls that function and it returns variables as a Python dictionary (similar to Java maps), with variable names as keys and variable values as values. Variables are considered to be scalars, unless prefixed with LIST__, and values can contain anything. The example below is identical to the first examples of creating variables directly.
def get_variables():
    variables = { "VARIABLE ": "An example string",
                  "ANOTHER_VARIABLE": "This is pretty easy!",
                  "INTEGER": 42,
                  "STRINGS": ["one", "two", "kolme", "four"],
                  "NUMBERS": [1, 42, 3.14],
                  "LIST__STRINGS": ["list", "of", "strings"],
                  "LIST__MIXED": ["first value", -1.1, None, True] }
    return variables
get_variables can also take arguments. This feature facilitates changing which variables actually are created. Arguments to the function are set just as any other arguments for a Python function, and when importing the file, arguments are specified in cells after the path to the variable file. The dummy example below illustrates this principle. In a more realistic example, the argument could be a path to an external text file or database where to read variables from.
variables1 = { 'scalar': 'Scalar variable',
               'LIST__list': ['List','variable'] }
variables2 = { 'scalar' : 'Some other value',
               'LIST__list': ['Some','other','value'],
               'extra': 'variables1 does not have this at all' }

def get_variables(arg):
    if arg == 'one':
        return variables1
    else:
        return variables2
The most notable benefit of using get_variables instead of defining variables directly as global attributes of the variable file is the ability to use arguments. On the other hand, the main drawback is that this approach always requires some actual programming.
2.8 Advanced features
2.8.1 Handling keywords with same names
Keywords that are used with Robot Framework are either library keywords or user keywords. The former come from standard libraries or external libraries, and the latter are either created in the same file where they are used or then imported from resource files. When many keywords are in use, it is quite common that some of them have the same name, and this section describes how to handle possible conflicts in these situations.
Keyword scopes
When only a keyword name is used and there are several keywords with that name, Robot Framework attempts to determine which keyword has the highest priority based on its scope. The keyword's scope is determined on the basis of how the keyword in question is created:
- Created as a user keyword in the same file where it is used. These keywords have the highest priority and they are always used, even if there are other keywords with the same name elsewhere.
- Created in a resource file and imported either directly or indirectly from another resource file. This is the second-highest priority.
- Created in an external test library. These keywords are used, if there are no user keywords with the same name. However, if there is a keyword with the same name in the standard library, a warning is displayed.
- Created in a standard library. These keywords have the lowest priority.
Specifying a keyword explicitly
Scopes alone are not a sufficient solution, because there can be keywords with the same name in several libraries or resources, and additionally, they provide a mechanism to use only the keyword of the highest priority. In such cases, it is possible to use the full name of the keyword, where the keyword name is prefixed with the name of the resource or library and a dot is a delimiter.
With library keywords, the long format means only using the format LibraryName.Keyword Name. For example, the keyword Run from the OperatingSystem library could be used as OperatingSystem.Run, even if there was another Run keyword somewhere else. If the library is in a module or package, the full module or package name must be used (for example, com.company.Library.Some Keyword). If a custom name is given to a library using the WITH NAME syntax, the specified name must be used also in the full keyword name.
Resource files are specified in the full keyword name, similarly as library names. The name of the resource is derived from the basename of the resource file without the file extension. For example, the keyword Example in a resource file myresources.html can be used as myresources.Example. Note that this syntax does not work, if several resource files have the same basename. In such cases, either the files or the keywords must be renamed. The full name of the keyword is case-, space- and underscore-insensitive, similarly as normal keyword names.
2.8.2 Timeouts
Keywords may be problematic in situations where they take exceptionally long to execute or just hang endlessly. Robot Framework allows you to set timeouts both for test cases and user keywords, and if a test or keyword is not finished within the specified time, the keyword that is currently being executed is forcefully stopped. Stopping keywords in this manner may leave the library or system under test to an unstable state, and timeouts are recommended only when there is no safer option available. In general, libraries should be implemented so that keywords cannot hang or that they have their own timeout mechanism, if necessary.
Note
Before Robot Framework version 1.8.3, it was possible to define if the keyword run was stopped or left running in the background when a timeout occurred. This feature is now removed and keywords are always stopped.
Test case timeout
The test case timeout can be set either by using the Test Timeout setting in the Setting table or the [Timeout] setting in the Test Case table. Test Timeout in the Setting table defines a default test timeout value for all the test cases in the test suite, whereas [Timeout] in the Test Case table applies a timeout to an individual test case and overrides the possible default value.
Regardless of where the test timeout is defined, the first cell after the setting name contains the duration of the timeout. The duration must be given in Robot Framework's time format, that is, either directly in seconds or in a format like 1 minute 30 seconds. It must be noted that there is always some overhead by the framework, and timeouts shorter than one second are thus not recommended.
The default error message displayed when a test timeout occurs is Test timeout <time> exceeded. It is also possible to use custom error messages, and these messages are written into the cells after the timeout duration. The message can be split into multiple cells, similarly as documentations. Both the timeout value and the error message may contain variables.
If there is a timeout, the keyword running is stopped at the expiration of the timeout and the test case fails. However, keywords executed as test teardown are not interrupted if a test timeout occurs, because they are normally engaged in important clean-up activities. If necessary, it is possible to interrupt also these keywords with user keyword timeouts.
| Setting | Value | Value | Value |
|---|---|---|---|
| Test Timeout | 2 minutes |
| Test Case | Action | Argument | Argument | Argument |
|---|---|---|---|---|
| Default Timeout | [Documentation] | Timeout from the Setting table is used | ||
| Some Keyword | argument | |||
| Override | [Documentation] | Override default, use 10 seconds timeout | ||
| [Timeout] | 10 | |||
| Some Keyword | argument | |||
| Custom Message | [Documentation] | Override default and use custom message | ||
| [Timeout] | 1min 10s | This is my custom error. | It continues here. | |
| Some Keyword | argument | |||
| Variables | [Documentation] | It is possible to use variables too | ||
| [Timeout] | ${TIMEOUT} | |||
| Some Keyword | argument | |||
| No Timeout | [Documentation] | Empty timeout means no timeout even when | Test Timeout has been used | |
| [Timeout] | ||||
| Some Keyword | argument |
User keyword timeout
A timeout can be set for a user keyword using the [Timeout] setting in the Keyword table. The syntax for setting it, including how timeout values and possible custom messages are given, is identical to the syntax used with test case timeouts. If no custom message is provided, the default error message Keyword timeout <time> exceeded is used if a timeout occurs.
| Keyword | Action | Argument | Argument |
|---|---|---|---|
| Timed Keyword | [Documentation] | Set only the timeout value | and not the custom message. |
| [Timeout] | 1 minute 42 second s | ||
| Do Something | |||
| Do Something Else | |||
| Timed-out Wrapper | [Arguments] | @{args} | |
| [Documentation] | This keyword is a wrapper | that adds a timeout to another keyword. | |
| [Timeout] | 2 minutes | Original Keyword didn't finish in 2 minutes | |
| Original Keyword | @{args} |
A user keyword timeout is applicable during the execution of that user keyword. If the total time of the whole keyword is longer than the timeout value, the currently executed keyword is stopped. User keyword timeouts are applicable also during a test case teardown, whereas test timeouts are not.
If both the test case and some of its keywords (or several nested keywords) have a timeout, the active timeout is the one with the least time left.
2.8.3 For loops
Repeating same actions several times is quite a common need in test automation. With Robot Framework, test libraries can have any kind of loop constructs, and most of the time loops should be implemented in them. Robot Framework also has its own For loop syntax, which is useful, for example, when there is a need to repeat keywords from different libraries.
For loops can be used with both test cases and user keywords. Except for really simple cases, user keywords are better, because they hide the complexity introduced by for loops. The basic for loop syntax, FOR item IN sequence, is derived from Python, but similar syntax is possible also in shell scripts or Perl.
Normal for loop
In a normal For loop, one variable is assigned into a list of values, one value per iteration. The syntax starts with :FOR, where colon is required to separate the syntax from normal keywords. The next cell contains the loop variable, the subsequent cell must have IN, and the final cells contain values over which to iterate.
The keywords used in the For loop are on the next rows and they must be indented one cell to the right. The For loop ends when the indentation returns back to normal or the table ends. Having nested For loops directly is not supported, but it is possible to use a user keyword inside a For loop and have another For loop there.
| Test Case | Action | Argument | Argument | Argument | Arguments |
|---|---|---|---|---|---|
| Example 1 | :FOR | ${animal} | IN | cat | dog |
| Log | ${animal} | ||||
| Log | 2nd keyword | ||||
| Log | Outside loop | ||||
| Example 2 | :FOR | ${var} | IN | one | two |
| ... | three | four | five | six | |
| ... | seven | ||||
| Log | ${var} |
The For loop in Example 1 above is executed twice, so that first the loop variable ${animal} has the value cat and then dog. The loop consists of two Log keywords. In the second example, loop values are split into several rows and the loop is run altogether seven times.
For loops are most useful and also clearest when they are used with list variables. This is illustrated by the example below, where @{ELEMENTS} contains an arbitrary long list of element names and Start Element is used with all of them.
| Test Case | Action | Argument | Argument | Argument | Arguments |
|---|---|---|---|---|---|
| Example | :FOR | ${element} | IN | @{ELEMENTS} | |
| Start Element | ${element} |
Using several loop variables
It is also possible to use several loop variables. The syntax is the same as with the normal For loop, but all loop variables are listed in the cells between :FOR and IN. There can be any number of loop variables, but their number must match the number of loop values. The number of values must be evenly dividable by the number of variables.
This syntax naturally works both with and without list variables. In the former case, it is often possible to organize loop values below loop variables, as in the first part of the example below:
| Test Case | Action | Argument | Argument | Argument | Arguments |
|---|---|---|---|---|---|
| Example | :FOR | ${index} | ${english} | ${finnish} | IN |
| ... | 1 | cat | kissa | ||
| ... | 2 | dog | koira | ||
| ... | 3 | horse | hevonen | ||
| Do X | ${english} | ||||
| Y Should Be | ${finnish} | ${index} | |||
| :FOR | ${name} | ${id} | IN | @{EMPLOYERS} | |
| Create | ${name} | ${id} |
For in range
Earlier For loops always iterated over a sequence, and this is also the most common use case. Sometimes it is still convenient to have a For loop that is executed a certain number of times, and Robot Framework has a special FOR index IN RANGE limit syntax for this purpose. This syntax is derived from the similar Python idiom.
Similarly as other For loops, the For in range loop starts with :FOR and the loop variable is in the next cell. In this format there can be only one loop variable and it contains the current loop index. The next cell must contain IN RANGE and the subsequent cells loop limits.
In the simplest case, only the upper limit of the loop is specified. In this case, loop indexes start from zero and increase by one until, but excluding, the limit. It is also possible to give both the start and end limits. Then indexes start from the start limit, but increase similarly as in the simple case. Finally, it is possible to give also the step value that specifies the increment to use. If the step is negative, it is used as decrement. All these possibilities are illustrated by the examples below.
| Test Case | Action | Argument | Argument | Arg | Arg | Arg |
|---|---|---|---|---|---|---|
| Only upper limit | [Documentation] | Loops over | values | from 0 | to 9 | |
| :FOR | ${index} | IN RANGE | 10 | |||
| Log | ${index} | |||||
| Start and end | [Documentation] | Loops over | values | from 1 | to 10 | |
| :FOR | ${index} | IN RANGE | 1 | 11 | ||
| Log | ${index} | |||||
| Also step given | [Documentation] | Loops over | values | 5, 15, | and 25 | |
| :FOR | ${index} | IN RANGE | 5 | 26 | 10 | |
| Log | ${index} | |||||
| Negative step | [Documentation] | Loops over | values | 13, 3, | and -7 | |
| :FOR | ${index} | IN RANGE | 13 | -13 | -10 | |
| Log | ${index} |
2.8.4 Conditional execution
In general, it is not recommended to have conditional logic in test cases, or even in user keywords, because it can make them hard to understand and maintain. Instead, this kind of logic should be in test libraries, where it can be implemented using natural programming language constructs. However, some conditional logic can be useful at times, and even though Robot Framework does not have an actual if/else construct, there are several ways to get the same effect.
- The name of the keyword used as a setup or a teardown of both test cases and test suites can be specified using a variable. This facilitates changing them, for example, from the command line.
- The BuiltIn keyword Run Keyword takes a keyword to actually execute as an argument, and it can thus be a variable. The value of the variable can, for example, be got dynamically from an earlier keyword or given from the command line.
- The BuiltIn keywords Run Keyword If and Run Keyword Unless execute a named keyword only if a certain expression is true or false, respectively. They are ideally suited to creating simple if/else constructs. For an example, see the documentation of the former.
- Another BuiltIn keyword, Set Variable If, can be used to set variables dynamically based on a given expression.
- There are several BuiltIn keywords that allow executing a named keyword only if a test case or test suite has failed or passed.
2.8.5 Parallel execution of keywords
By default, all keywords are executed sequentially, so that a new keyword is started only after the previous one has ended. Of course, it is possible to create a library so that some keyword starts an action in the background and returns immediately, and there is another keyword that can later be used to check the status of the background process or other action.
Robot Framework also has native support for parallel execution of keywords. The syntax for it is using :PARALLEL in the second column of the Test Case or Keyword table, similarly as :FOR is used with For loops. In both cases, a colon (:) must be used to separate them from normal keywords. Keywords inside a parallel block are also indented, similarly as keywords in a For loop. The difference is that there is no need to have anything after :PARALLEL, and normally the first keyword of the parallel block is already there.
When a parallel block is executed, all the keywords in it are started in the background, one after another, and the whole block returns only after all the keywords have been completed. A parallel block fails if any of its keywords fails, but even in this case, Robot Framework waits that all keywords are finished. It is even possible that several keywords in a block fail.
| Test Case | Action | Argument | Argument | Argument |
|---|---|---|---|---|
| Parallel once | Log | Before parallel | ||
| :PARALLEL | Log | Inside parallel | ||
| Sleep | 2 seconds | |||
| Log | Inside parallel | |||
| Log | After parallel | |||
| Parallel twice | :PARALLEL | Sleep | 2 seconds | |
| Log | First parallel | |||
| :PARALLEL | Log | Second parallel | ||
| Fail | First failure | |||
| Fail | Second failure |
It is not possible to have nested parallel blocks, or to have a For loop inside a parallel block, or the other way around. However, you can have a user keyword inside a parallel block, and use another parallel block or a For loop there.
Warning
Parallel execution cannot be used with timeouts and it does not work correctly with any Run Keyword XXX keywords in the BuiltIn library. In general, it is a quite experimental and not much used feature, and it may also have other peculiar problems.
3 Executing test cases
3.1 Basic usage
Robot Framework test cases are executed from the command line, and the end result is, by default, an output file in the XML format and an HTML report and log. After the execution, output files can be combined and otherwise post-processed with the rebot tool.
3.1.1 Starting test execution
Different runner scripts
Test execution is normally started with the pybot or jybot commands. These commands are otherwise identical, but the former executes tests using the Python interpreter and the latter uses Jython. Which one to use depends on the needed test libraries. Some libraries use modules or syntax available only on Python, others use Java-based tools that require Jython, and some work on both. If you can use either pybot or jybot, the former is recommended, as Python is somewhat faster than Jython.
Another possibility for starting the test execution is running the runner.py script under the installed robot module directly. This method allows selecting the interpreter and setting command line options to it freely. The most common use case is altering the options controlling JVM maximum memory consumption.
Regardless of the runner script, a path (or paths) to the test data to be executed is given as an argument. Additionally, different command line options can be used to alter the test execution or generated outputs in some way.
Specifying the test data to be executed
Robot Framework test cases are created in files and directories, and they are executed by giving the path to the file or directory in question to the selected runner script. The path can be absolute or, more commonly, relative to the directory where tests are executed from. The given file or directory creates the top-level test suite, which gets its name, unless overridden with the --name option, from the file or directory name. Different execution possibilities are illustrated in the examples below. Note that in these examples, as well as in other examples in this section, only the pybot command is used, but jybot or a custom runner script could be used similarly.
pybot test_cases.html
pybot path/to/my_tests/
pybot /opt/robot/tests.html
pybot c:\robot\tests.html
It is also possible to give paths to several test case files or directories at once, separated with spaces. In this case, Robot Framework creates the top-level test suite automatically, and the specified files and directories become its child test suites. The name of the created test suite is got from child suite names by catenating them together with an ampersand (&) and spaces. For example, the name of the top-level suite in the first example below is My Tests & Your Tests. These automatically created names are seldom very good and they are often quite long. In most cases, it is thus better to use the --name option for overriding it, as in the second example below:
pybot my_tests.html your_tests.html
pybot --name Example path/to/tests/pattern_*.html
Using command line options
Robot Framework provides a number of command line options that can be used to control how test cases are executed and what outputs are generated. The syntax for using them is explained in this section. What options actually exist and how they can be used is discussed elsewhere in this chapter.
Short and long options
Options always have a long name, such as --name, and the most frequently needed options also have a short name, such as -N. In addition to that, long options can be shortened as long as they are unique. For example, --logle DEBUG works, while --lo log.html does not, because the former matches only --loglevel, but the latter matches several options. Short and shortened options are practical when executing test cases manually, but long options are recommended in start-up scripts, because they are easier to understand.
The long option format is case-insensitive, which facilitates writing option names in an easy-to-read format. For example, --SuiteStatLevel is equivalent to, but easier to read than --suitestatlevel.
Setting option values
Most of the options require a value, which is given after the option name. Both short and long options accept the value separated from the option name with a space, as in --include tag or -i tag. With long options, the separator can also be the equals sign, as in --include=tag, and with short options the separator can be omitted, as in -itag.
Some options can be specified several times. For example, --variable VAR1:value --variable VAR2:another sets two variables. If the options that take only one value are used several times, the value given last is effective.
Option value as simple pattern
Many of the options take arguments as simple patterns. This means that * and ? can be used as special characters, so that the former matches any string (even an empty string) and the latter matches any single character. For example, --include prefix-* matches all tags starting with prefix-, and --include a??? matches any tag that is four characters long and starts with a character a.
Generated outputs
The most visible output from test execution is the output displayed in the command line. All executed test suites and test cases, as well as their statuses, are shown there in real time. The example below shows the output from executing a simple test suite with only two test cases:
==============================================================================
Example test suite
==============================================================================
First test :: Possible documentation is here                          | PASS |
------------------------------------------------------------------------------
Second test                                                           | FAIL |
Error message is displayed here
==============================================================================
Example test suite                                                    | FAIL |
2 critical tests, 1 passed, 1 failed
2 tests total, 1 passed, 1 failed
==============================================================================
Output:  /path/to/output.xml
Report:  /path/to/report.html
Log:     /path/to/log.html
The command line output is very limited, and separate output files are normally needed for investigating the test execution. As the example above shows, three output files are generated by default. The first one is in the XML format and contains all the information about test execution. The second is a higher-level report and the third is a more detailed log file. These files and other possible output files are discussed in more detail in the section Different output files.
Return codes
Runner scripts communicate the overall test execution status to the system running them using return codes. The basic rule is that the return code is zero, which is a typical return code for success, when the execution starts successfully and no critical test fail. Possible return codes are explained in the table below.
| RC | Explanation |
|---|---|
| 0 | All critical tests passed. |
| 1-249 | Returned number of critical tests failed. |
| 250 | 250 or more critical failures. |
| 251 | Help or version information printed. |
| 252 | Invalid test data or command line options. |
| 255 | Unexpected internal error. |
Return codes should always be easily available after the execution, which makes it easy to automatically determine the overall execution status. For example, in bash shell the return code is in special variable $?, and in Windows it is in %ERRORLEVEL% variable. If you use some external tool for running tests, consult its documentation for how to get the return code.
3.1.2 Post-processing outputs
XML output files that are generated during the test execution can be post-processed afterwards by the rebot tool, which is an integral part of Robot Framework. It is used automatically when test reports and logs are generated during the test execution, but there are also good grounds for using it separately after the execution.
The basic syntax for using rebot is exactly the same as when starting test execution, return codes are the same, and also most of the command line options are identical. The main difference is that arguments to rebot are XML output files instead of test data files or directories.
Creating different reports and logs
You can use rebot for creating the same reports and logs that are created automatically during the test execution. Of course, it is not sensible to create the exactly same files, but, for example, having one report with all test cases and another with only some subset of tests can be useful. Another common usage is creating only the output file when running tests and generating logs and reports later. Tests can, for example, be executed on different environments, output files collected to a central place, and reports and logs created there. If generating reports and logs takes a lot of time when running tests on Jython, it is a good idea to try if using rebot, which always runs on Python, is any faster.
rebot output.xml
rebot path/to/output_file.xml
rebot --include smoke --name Smoke_Tests c:\results\output.xml
Combining outputs
The most important feature of rebot is its ability to combine outputs from different test execution rounds. This capability allows, for example, running the same test cases on different environments and generating an overall report from all outputs. Combining outputs is extremely easy, all that needs to be done is giving several output files as arguments:
rebot output1.xml output2.xml
rebot outputs/*.xml
When outputs are combined, a new top-level test suite is created so that test suites in the given output files are its child suites. This works the same way when multiple test data files or directories are executed, and also in this case the name of the top-level test suite is created by joining child suite names with an ampersand (&) and spaces. These automatically generated names are not that good, and it is often a good idea to use --name to give a more meaningful name:
rebot --name Browser_Compatibility firefox.xml opera.xml safari.xml ie.xml
rebot --include smoke --name Smoke_Tests c:\results\*.xml
3.1.3 Getting help on the command line
Both when executing test cases with pybot or jybot and when post-processing reports with rebot, it is possible to get command line help with the option --help and its short version -h. These help texts have a short general overview and briefly explain the available command line options.
All runner scripts also support getting the version information with the option --version. This information also contains Python or Jython version and the platform type:
$ pybot --version
Robot 2.0 (Python 2.5.1 on cygwin)

C:\>jybot --version
Robot 2.0 (Jython 2.2 on java1.6.0_03)

C:\>rebot --version
Rebot 2.0 (Python 2.5.2 on win32)
3.1.4 Handling complicated characters
Because spaces are used for separating options from each other, it is problematic to use them in option values. Some options, such as --name, automatically convert underscores to spaces, but with others spaces must be escaped. Additionally, many special characters are complicated to use on the command line.
Because escaping complicated characters with a backslash or quoting the values does not always work too well, Robot Framework has its own generic escaping mechanism. Another possibility is using argument files where options can be specified in the plain text format. Both of these mechanisms work both when executing tests and when post-processing outputs, and also some of the external supporting tools have the same or similar capabilities.
Escaping options
In Robot Framework's command line escaping mechanism, problematic characters are escaped with freely selected text. The command line option to use is --escape (short version -E), which takes an argument in the format what:with, where what is the name of the character to escape and with is the string to escape it with. Characters that can be escaped are listed in the table below:
| Character | Name to use | Character | Name to use |
|---|---|---|---|
| & | amp | ( | paren1 |
| ' | apos | ) | paren2 |
| @ | at | % | percent |
| \ | blash | | | pipe |
| : | colon | ? | quest |
| , | comma | " | quot |
| { | curly1 | ; | semic |
| } | curly2 | / | slash |
| $ | dollar | space | |
| ! | exclam | [ | square1 |
| > | gt | ] | square2 |
| # | hash | * | star |
| < | lt |
The following examples make the syntax more clear. In the first example, the metadata X gets the value Value with spaces, and in the second variable ${VAR} is assigned to "Hello, world!".
--escape space:_ --metadata X:Value_with_spaces
-E space:SP -E quot:QU -E comma:CO -E exclam:EX -v VAR:QUHelloCOSPworldEXQU
Note that all the given command line arguments, including paths to test data, are escaped. Escape character sequences thus need to be selected carefully.
Using argument files
Another possibility to handle complicated arguments is placing them into a argument file and using --argumentfile (short option -A) to specify the path to it, along with possible other options. These files can contain both command line options and paths to the test data, one per line. Argument files can contain any ASCII characters without escaping, but spaces in the beginning and end of lines are ignored. Additionally, empty lines and lines starting with a hash mark (#) are ignored.
An example argument file:
--doc This is an example (where "special characters" are ok!)
--metadata X:Value with spaces
--variable VAR:Hello, world!
# This is a comment line
path/to/test directory/
When an argument file is used on the command line, its contents are placed to the original list of arguments to the same place where the argument file option was. Argument files can be used either alone so that they contain all the options and paths to the test data, or along with other options and paths:
pybot --argumentfile all_arguments.txt
pybot --name example --argumentfile other_options_and_paths.txt
pybot --argumentfile default_options.txt --name example my_tests.html
3.1.5 Creating start-up scripts
Test cases are often executed automatically by a continuous integration system or some other mechanism. In such cases, there is a need to have a script for starting the test execution, and possibly also for post-processing outputs somehow. Similar scripts are also useful when running tests manually, especially if a large number of command line options are needed or setting up the test environment is complicated.
In UNIX-like environments, shell scripts provide a simple but powerful mechanism for creating custom start-up scripts. Windows batch files can also be used, but they are more limited and often also more complicated. A platform-independent alternative is using Python or some other high-level programming language. Regardless of the language, it is recommended that long option names are used, because they are easier to understand than the short names.
In the first examples, the same web tests are executed with different browsers and the results combined afterwards. This is easy with shell scripts, as practically you just list the needed commands one after another:
#!/bin/bash
pybot --variable BROWSER:Firefox --name Firefox --log none --report none --output out/fx.xml login
pybot --variable BROWSER:IE --name IE --log none --report none --output out/ie.xml login
rebot --name Login --splitoutputs 1 --outputdir out --output login.xml out/fx.xml out/ie.xml
Implementing the above example with Windows batch files is not very complicated, either. The most important thing to remember is that because pybot and rebot are implemented as batch files, call must be used when running them from another batch file. Otherwise execution would end when the first batch file is finished.
@echo off
call pybot --variable BROWSER:Firefox --name Firefox --log none --report none --output out\fx.xml login
call pybot --variable BROWSER:IE --name IE --log none --report none --output out\ie.xml login
call rebot --name Login --splitoutputs 1 --outputdir out --output login.xml out\fx.xml out\ie.xml
In the next examples, JAR files under the lib directory are put into CLASSPATH before starting the test execution. In these examples, start-up scripts require that paths to the executed test data are given as arguments. It is also possible to use command line options freely, even though some options have already been set in the script. All this is relatively straight-forward using bash:
#!/bin/bash

cp=.
for jar in lib/*.jar; do
    cp=$cp:$jar
done
export CLASSPATH=$cp

jybot --ouputdir /tmp/logs --splitoutputs 2 $*
Implementing this using Windows batch files is slightly more complicated. The difficult part is setting the variable containing the needed JARs inside a For loop, because, for some reason, that is not possible without a helper function. There is no need to use call, because only one batch file is executed.
@echo off

set CP=.
for %%jar in (lib\*.jar) do (
    call :set_cp %%jar
)
set CLASSPATH=%CP%

jybot --ouputdir c:\temp\logs --splitoutputs 2 %*

goto :eof

:: Helper for setting variables inside a for loop
:set_cp
    set CP=%CP%;%1
goto :eof
3.2 Configuring execution
This section explains different command line options that can be used for configuring the test execution or post-processing outputs. Options related to generated output files are discussed in the next section.
3.2.1 Selecting test cases
Robot Framework offers several command line options for selecting which test cases to execute. The same options also work when post-processing outputs with the rebot tool.
By test suite and test case names
Test suites and test cases can be selected by their names with the command line options --suite (-s) and --test (-t), respectively. Both of these options can be used several times to select several test suites or cases. Arguments to these options are case- and space-insensitive, and there can also be simple patterns matching multiple names. If both the --suite and --test options are used, only test cases in matching suites with matching names are selected.
--test Example
--test mytest --test yourtest
--test example*
--suite example-??
--suite mysuite --test mytest --test your*
Using the --suite option is more or less the same as executing only the appropriate test case file or directory. One major benefit is the possibility to select the suite based on its parent suite. The syntax for this is specifying both the parent and child suite names separated with a dot. In this case, the possible setup and teardown of the parent suite are executed.
--suite parent.child
--suite myhouse.myhousemusic --test jack*
Selecting individual test cases with the --test option is very practical when creating test cases, but quite limited when running tests automatically. The --suite option can be useful in that case, but in general, selecting test cases by tag names is more flexible.
By tag names
It is possible to include and exclude test cases by tag names with the --include (-i) and --exclude (-e) options, respectively. When the former is used, only test cases having a matching tag are selected, and with the latter, test cases having a matching tag are not. If both are used, only tests with a tag matching the former option, and not with a tag matching the latter, are selected.
--include example
--exclude not_ready
--include regression --exclude long_lasting
Both --include and --exclude can be used several times to match multiple tags, and their arguments can be simple patterns. In these cases, the rules for selecting test cases apply, so that test cases with a tag matching any include patterns are selected, and tests with a tag matching exclude patterns are not. It is also possible to select only test cases that have two or more specified tags by separating the tags either with & or AND (case-sensitive). Similarly, only tests with a certain tag, but without some others, can be selected by separating these tags with NOT (case-sensitive).
--include req-*
--include regressionANDiter-42
--include tag1&tag2&tag3&tag4
--exclude regressionNOTowner-*
Selecting test cases by tags is a very flexible mechanism and allows many interesting possibilities:
- A subset of tests to be executed before other tests can be tagged with smoke and executed with --include smoke.
- Unfinished test can be committed to version control with the tag not_ready and excluded from the test execution with --exclude not_ready.
- Tests can be tagged with iter-<num>, where <num> specifies the number of the current iteration, and after executing all test cases, a separate report containing only the tests for a certain iteration can be generated (for example, rebot --include iter-42 ouput.xml).
3.2.2 Setting criticality
The final result of test execution is determined on the basis of critical tests. If a single critical test fails, the whole test run is considered failed. On the other hand, non-critical test cases can fail and the overall status is still passed.
By default, all test cases are critical, but this can be changed with the --critical (-c) and --noncritical (-n) options. These options specify which test cases are consider critical based on tags, similarly as --include and --exclude are used to select test cases by tag names. If only --critical is used, test cases with a matching tag are critical. If only --noncritical is used, tests without a matching tag are critical. Finally, if both are used, only test with a critical tag but without a non-critical tag are considered critical. Both of these options accept simple patterns and can be given several times.
--critical regression
--noncritical not_ready
--critical iter-* --critical req-* --noncritical req-6??
The most common use case for setting criticality is having test cases that are not ready or test features still under development in the test execution. Of course, these tests could be excluded from the test execution altogether with the --exclude option, but including them as non-critical tests enables you to see when they start to pass.
Note
Currently, criticality set when tests are executed is not changed when post-processing outputs, unless --critical or --noncritical is used explicitly. In the future, this will change so that they are to be used always. It is thus recommended to use them with rebot already now.
3.2.3 Setting metadata
Setting the name
When Robot Framework parses test data, test suite names are created from file and directory names. The name of the top-level test suite can, however, be overridden with the command line option --name (-N). Underscores in the given name are converted to spaces automatically, and words in the name capitalized.
Setting the documentation
In addition to defining documentation in the test data, documentation of the top-level suite can be given from the command line with the option --doc (-D). Underscores in the given documentation are converted to spaces, and it may contain simple HTML formatting.
Setting free metadata
Free test suite metadata may also be given from the command line with the option --metadata (-M). The argument must be in the format name:value, where name the name of the metadata to set and value is its value. Underscores in the former are converted to spaces and words capitalized, and the latter may contain simple HTML formatting. This option may be used several times to set multiple metadata.
Setting tags
The command line option --settag (-G) can be used to set the given tag to all executed test cases. This option may be used several times to set multiple tags.
3.2.4 Adjusting library search path
When a test library is taken into use, Robot Framework uses the Python or Jython interpreter to import a module implementing the library from the system. The location where these modules are searched from is called PYTHONPATH, and when running tests on Jython, also Java CLASSPATH is used.
Adjusting the library search path so that libraries are found is a requirement for successful test execution. In addition to find test libraries, the search path is also used to find listeners set on the command line. There are various ways to alter PYTHONPATH and CLASSPATH, but regardless of the selected approach, it is recommended to use a custom start-up script.
Locations automatically in PYTHONPATH
Python and Jython installations put their own library directories into PYTHONPATH automatically. This means that test libraries packaged using Python's own packaging system are automatically installed into a location that is in the library search path. Robot Framework also puts the directory containing its standard libraries and the directory where tests are executed from into PYTHONPATH.
Setting PYTHONPATH in system
There are several ways to alter PYTHONPATH in the system, but the most common one is setting an environment variable with the same name before the test execution. Jython actually does not use PYTHONPATH environment variable normally, but Robot Framework ensures that locations listed in it are added into the library search path regardless the interpreter.
Setting CLASSPATH in the system
CLASSPATH is used only with Jython, and the most common way to alter it is setting an environment variable similarly as with PYTHONPATH. Note that instead of CLASSPATH, it is always possible to use PYTHONPATH with Jython, even with libraries and listeners implemented with Java.
Using the --pythonpath option
Robot Framework also has a separate command line option --pythonpath (-P) for adding directories or archives into PYTHONPATH. Multiple paths can be given by separating them with a colon (:) or using this option several times. The given path can also be a glob pattern matching multiple paths, but then it normally must be escaped.
Examples:
--pythonpath libs/
--pythonpath /opt/testlibs:mylibs.zip:yourlibs
--pythonpath mylib.jar --pythonpath lib/STAR.jar --escape star:STAR
3.2.5 Setting variables
Variables can be set from the command line either individually using the --variable (-v) option or through variable files with the --variablefile (-V) option. Variables and variable files are explained in separate chapters, but the following examples illustrate how to use these options:
--variable name:value
--variable OS:Linux --variable IP:10.0.0.42
--variablefile path/to/variables.py
--variable ENVIRONMENT:Windows --variablefile c:\resources\windows.py
3.2.6 Setting the execution mode
The command line option --runmode can be used to alter the test execution. Possible values for it are listed and explained below, other values are silently ignored. All these values are case-insensitive.
- ExitOnFailure
- Test execution is stopped immediately if a critical test fails. All remaining tests are marked failed with the message Critical failure occurred and ExitOnFailure option is in use. This option is new in version 1.8.7.
- random:test
- Test cases inside each test suite are executed in random order. This option is new in version 1.8.6.
- random:suite
- All test suites are executed in a random order, but test cases inside suites are run in the order they are defined. This option is new in version 1.8.6.
- random:all
- Both test cases and test suites are executed in a random order. This option is new in version 1.8.6.
3.2.7 Controlling the monitor output
The width of the test execution output in the console is set using the option --monitorwidth (-W). The default value for the monitor width is 78 characters.
The --monitorcolors (-C) option is used to control whether colors should be used in the monitor output. These so-called ANSI colors do not work on Windows by default, but they ought to work on all UNIX-like systems. This option has three possible, case-insensitive values:
- on
- Colors are used on UNIX-like systems, but not on Windows. This is the default.
- off
- Colors are never used. Useful for example when redirecting the output to a file.
- force
- Colors are always used, also on Windows.
Example:
pybot --monitorwidth 140 --monitorcolors OFF tests.html > output.txt
3.2.8 Setting listeners
So-called listeners can be used for monitoring the test execution. They are taken into use with the command line option --listener, and the specified listeners must be in the module search path similarly as test libraries.
3.3 Created outputs
Several output files are created when tests are executed, and most of them are somehow related to test results. This section discusses what outputs are created, how to configure where they are created, and how to fine-tune their contents.
3.3.1 Different output files
This section explains what different output files can be created and how to configure where they are created. Output files are configured using command line options, which get the path to the output file in question as an argument. A special value NONE (case-insensitive) can be used to disable creating a certain output file.
Output directory
All output files can be set using an absolute path, in which case they are created to the specified place, but in other cases, the path is considered relative to the output directory. The default output directory is the directory where the execution is started from, but it can be altered with the --outputdir (-d) option. The path set with this option is, again, relative to the execution directory, but can naturally be given also as an absolute path. Regardless of how a path to an individual output file is obtained, its parent directory is created automatically, if it does not exist already.
Output file
Output files contain all the test execution results in the XML format. Log, report, and summary files are generated based on output files, and output files can also be combined and otherwise post-processed after the test execution.
The command line option --output (-o) determines where output files are created. Output files are always created when tests are executed, and the default name for them is output.xml. When post-processing outputs, new output files are not created unless this option is explicitly used.
Log file
Log files contain details about the executed test cases in HTML format. They have a hierarchical structure showing test suite, test case and keyword details. Log files are needed nearly every time when test results are to be investigated in detail. Even though log files also have statistics, report and summary files are better for getting an higher-level overview.
The command line option --log (-l) determines where log files are created. Unless the special value NONE is used, log files are always created and their default name is log.html.
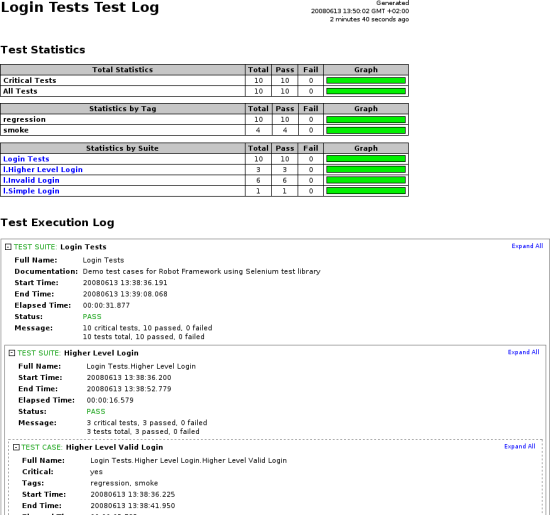
An example of beginning of log file
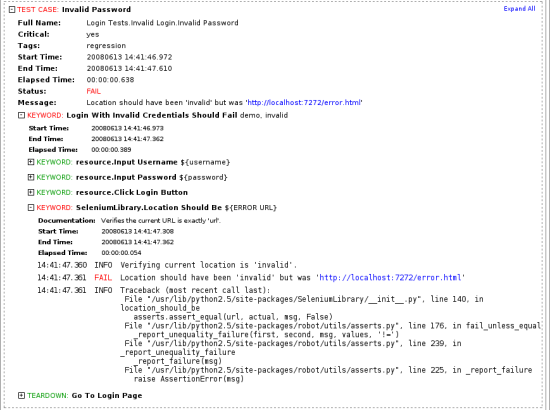
An example of log file with keyword details visible
Report file
Report files contain an overview of the test execution results in HTML format. They have statistics based on tags and executed test suites, as well as a list of all executed test cases. When both reports and logs are generated, the report has links to the log file for easy navigation to more detailed information. It is easy to see the overall test execution status from reports, because their background color is green, if all critical tests pass, and bright red otherwise.
The command line option --report (-r) determines where report files are created. Similarly as log files, reports are always created unless NONE is used as a value, and their default name is report.html.
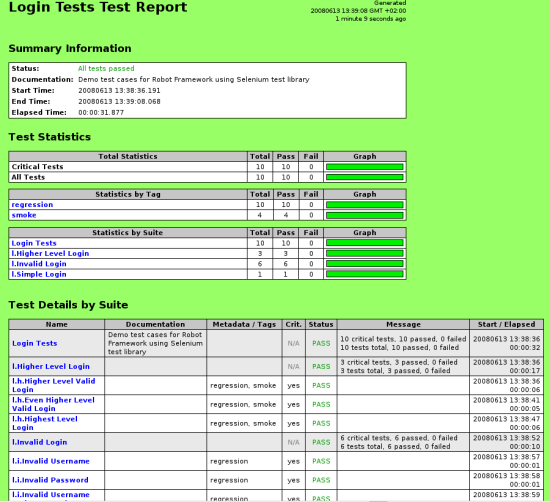
An example report file of successful test execution
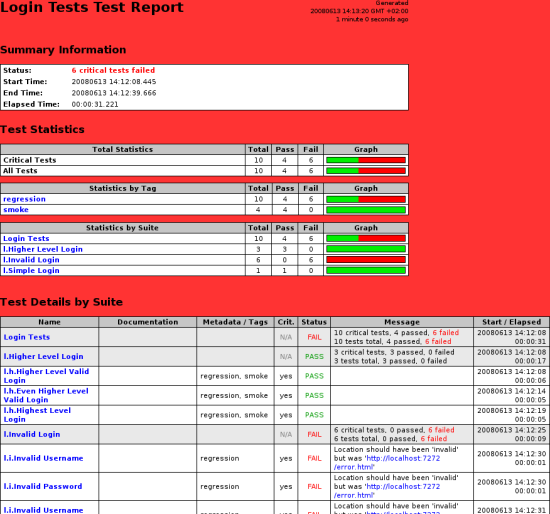
An example report file of failed test execution
Summary file
Summary files contain the same statistics as reports, and their background color is similarly green or red, depending on the overall test execution status. However, they have no test case details, which makes them much smaller. They are useful when a large number of test cases is executed and a very high-level overview is needed.
Summary files are not generated by default. When they are needed, they can be created using the command line option --summary (-S).
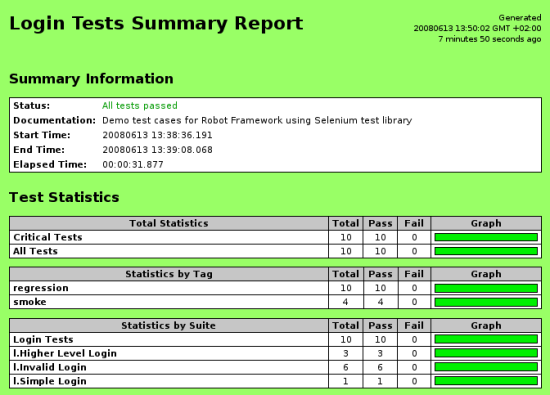
An example summary file
Debug file
Debug files are plain text files that are written during the test execution. All messages got from test libraries are written to them, as well as information about started and ended test suites, test cases and keywords. Debug files can be used for monitoring the test execution. This can be done using, for example, a separate file viewer tool, or in UNIX-like systems, simply with the tail -f command.
Debug files are not created unless the command line option --debugfile (-b) is used explicitly.
Timestamping output files
All output files listed in this section can be automatically timestamped with the option --timestampoutputs (-T), which is one of the rare options taking no value. When this option is used, a timestamp in the format YYYYMMDD-hhmmss is placed between the extension and the basename of each file. The example below would, for example, create such output files as output-20080604-163225.xml and mylog-20080604-163225.html.
pybot --timestampoutputs --log mylog.html --report NONE tests.html
Setting titles
The default titles for log, report and summary files are generated by prefixing the name of the top-level test suite with Test Log, Test Report or Summary Report. Custom titles can be given from the command line using the options --logtitle, --reporttitle and --summarytitle, respectively. With all these options, underscores in the given title are converted to spaces automatically.
Examples:
pybot --logtitle Smoke_Test_Log --reporttitle Smoke_Test_Report --include smoke mytests
rebot --summarytitle Overview --summary overview.html --log none --report none *.xml
3.3.2 Log levels
Available log levels
Messages in log files can have different log levels. Some of the messages are written by Robot Framework itself, but also executed keywords can log information using different levels. The available log levels are:
- FAIL
- Used when a keyword fails. Can be used only by Robot Framework.
- WARN
- Used to display warnings. Note that warnings do not change the test case status, so they can easily be missed.
- INFO
- The default level for normal messages. By default, messages below this level are not shown in the log file.
- DEBUG
- Used for debugging purposes. Useful for example for logging what libraries are doing internally.
- TRACE
- Another debugging level. Robot Framework itself logs the actual values of keyword arguments and the return values using this level.
Setting log level
By default, log messages below INFO are not logged, but this threshold level can be changed from the command line using the --loglevel (-L) option. This option takes any of the available log levels as an argument, and that level becomes the new threshold level. A special value NONE can also be used to disable logging altogether.
Another possibility to change the log level is using the BuiltIn keyword Set Log Level in the test data. It takes the same arguments as the --loglevel option, and it also returns the old level so that it can be restored later, for example, in a test teardown.
3.3.3 Splitting outputs
Benefits
When executing a large number of test cases, the size of log files can increase to the extent that opening them into browsers is slow. Additionally, since log files can be created only after output files are ready, they are available only after the test execution. This is not a problem if the test execution time is short, but with long-running tests it is better to be able to investigate the first failures while the rest of the tests are still running.
Splitting outputs provides a solution for both of these problems. First of all, splitting logs means that individual log files are smaller and thus faster to open. If outputs are split while executing test cases, the lower-level log files are also created immediateay when the equivelent output files are ready. Notifications about created files can be received through the listener interface, and automatic variables ${LOG_FILE} and ${OUTPUT_FILE} always contain the path to the current file.
Specifying a split level
Outputs are split from a certain test suite level. Suites below this level will get their own outputs, and everything above the level will be in an index file, which has links to lower-level files. Only output files and log files are split, and they are always split from the same level. Splitting outputs gives the best results when test cases are organized into a relatively balanced hierarchical structure.
Splitting can be activated with the command line option --splitoutputs, which takes the split level as an argument. Index files have the same name as the output and log would have without splitting, and lower-level files get a running counter between the basename and extension.
Examples
Explaining how splitting outputs actually works is easiest with examples, and it is also a good idea to experiment with real test data. In these examples we assume that test cases are organized into test suites hierarchically in the following way:
project
|-- component_a
|   |-- feature_a1
|   |   |-- a11.html
|   |   `-- a12.html
|   `-- feature_a2
|       `-- a21.html
|-- component_b
|   `-- feature_b1
|       |-- b11.html
|       `-- b21.html
`-- component_c
    |-- c1.html
    |-- c2.html
    `-- c3.html
In the first example these test cases are executed so that they are split right below the top-level test suite. The command line to use is as follows, and the following table lists all the created output files:
pybot --splitoutputs 1 project
| Created File | Contents |
|---|---|
| output.xml | Information about the Project test suite, excluding its child test suites. Lower-level output files are referenced. |
| output-001.xml | Information about the whole Component A suite. |
| output-002.xml | Information about the whole Component B suite. |
| output-003.xml | Information about the whole Component C suite. |
| log.html | A log file created from output.xml, lower-level log files are linked. |
| log-001.html | A log file created from output-001.xml. |
| log-002.html | A log file created from output-002.xml. |
| log-003.html | A log file created from output-003.xml. |
| report.html | A normal report file. |
The fact that output files are split is transparent when post-processing outputs afterwards, and it is enough to point rebot to the index file. Splitting works with rebot regardless of whether outputs are split earlier or not. Outputs created by the first example could thus by re-split, for example, as:
rebot --splitoutputs 2 output.xml
In this example, splitting is done from the second level. The table below again lists created the files, and because rebot does not create new output files by default, they are not listed in the table either.
| Created File | Contents |
|---|---|
| log.html | Information about the Project and all the Component ? suites, but not their child suites. Lower-level log files are linked. |
| log-001.html | The whole Feature A1 test suite. |
| log-002.html | The whole Feature A2 test suite. |
| log-003.html | The whole Feature B1 test suite. |
| log-004.html | The whole C1 test suite. |
| log-005.html | The whole C2 test suite. |
| log-006.html | The whole C3 test suite. |
| report.html | A normal report file. |
The last example splits outputs from the third level. It also shows how to configure output file names when splitting:
rebot --splitoutputs 3 --log mylog.html --report none output.xml
| Created File | Contents |
|---|---|
| mylog.html | Information about the Project test suite all the way to its second-level child suites. This includes test cases in the C? suites. Lower-level logs are linked. |
| mylog-001.html | The whole A11 test suite. |
| mylog-002.html | The whole A12 test suite. |
| mylog-003.html | The whole A21 test suite. |
| mylog-004.html | The whole B11 test suite. |
| mylog-005.html | The whole B12 test suite. |
If a split level higher than three is used with this test data, all the information ends up to index files. The end result is thus exactly the same as if outputs were not split at all.
3.3.4 Configuring statistics
There are several command line options that can be used to configure and adjust the contents of the Statistics by Tag, Statistics by Suite and Test Details by Tag tables in different output files. All these options work both when executing test cases and when post-processing outputs.
Configuring displayed suite statistics
When a deeper suite structure is executed, showing all the test suite levels in the Statistics by Suite table may make the table somewhat difficult to read. You can control the number of levels displayed with the command line option --suitestatlevel. It takes the required level as an integer, and if 0 is used, the whole table is removed.
Including and excluding tag statistics
When many tags are used, the Statistics by Tag table can become quite congested. If this happens, the command line options --tagstatinclude and --tagstatexclude can be used to select which tags to display, similarly as --include and --exclude are used to select test cases:
--tagstatinclude some-tag --tagstatinclude another-tag
--tagstatexclude owner-*
--tagstatinclude prefix-* --tagstatexclude prefix-13
These settings affect also the Test Details by Tag table, so that it has details only by the selected tags. This can make the report considerably smaller, which is why excluding tags that are not interesting can be recommended.
Generating combined tag statistics
The command line option --tagstatcombine can be used to generate aggregate tags that combine statistics from multiple tags. These new combined tags are shown in the Statistics by Tag table, and the matching tests are listed in the Test Details by Tag table. There are three somewhat different ways for giving arguments for this option:
- One tag as a simple pattern
- All tags matching the given pattern are combined together.
- Two or more tags separated by AND or &
- The combined statistics contain tests that have all the listed tags. Tags can be given as simple patterns.
- Two or more tags separated by NOT
- The combined statistics contain tests that have the first tag but not the others. Also in this case tags may be patterns.
The following examples illustrate these usages, and the figure below shows a snippet of the resulting Statistics by Tag table when the example test data is executed with these options:
--tagstatcombine owner-*
--tagstatcombine smokeANDmytag
--tagstatcombine smokeNOTowner-janne*

Examples of combined tag statistics
Creating links from tag names
You can add external links to the Statistics by Tag table by using the command line option --tagstatlink. Arguments to this option are given in the format tag:link:name, where tag specifies the tags to assign the link to, link is the link to be created, and name is the name to give to the link.
tag may be a single tag, but more commonly a simple pattern where * matches anything and ? matches any single character. When tag is a pattern, the matches to wildcards may be used in link with the syntax %N, where "N" is the index of the match starting from 1.
The following examples illustrate the usage of this option, and the figure below shows a snippet of the resulting Statistics by Tag table when example test data is executed with these options:
--tagstatlink mytag:http://www.google.com:Google
--tagstatlink jython-bug-*:http://bugs.jython.org/issue_%1:Jython-bugs
--tagstatlink owner-*:mailto:%1@domain.com?subject=Acceptance_Tests:Send_Mail

Examples of links from tag names
Adding documentation to tags
Tags can be given a documentation with the command line option --tagdoc, which takes an argument in the format tag:doc. "tag" is the name of the tag to assign the documentation to, and it can also be a simple pattern matching multiple tags. "doc" is the assigned documentation. Underscores in it are converted to spaces automatically, and it can also contain HTML formatting. The given documentation is shown with matching tags in the Test Details by Tag table, and as a tool tip for these tags in the Statistics by Tag table.
Examples:
--tagdoc mytag:My_documentation
--tagdoc regression:*See*_http://info.html
--tagdoc owner-*:Original_author
3.3.5 Additional options for post-processing outputs
These options are available only when post-processing outputs with rebot.
Setting times for combined outputs
When combining outputs, it is possible to set the start and end time of the combined test suite using the options --starttime and --endtime, respectively. This is convenient, because by default, combined suites do not have these values. When both the start and end time are given, the elapsed time is also calculated based on them. Otherwise the elapsed time is got by adding the elapsed times of the child test suites together.
Times must be given as timestamps in the format YYYY-MM-DD hh:mm:ss.mil, where all separators are optional and the parts from milliseconds to hours can be omitted. For example, 2008-06-11 17:59:20.495 is equivalent both to 20080611-175920.495 and 20080611175920495, and also mere 20080611 would work.
Examples:
rebot --starttime 20080611-17:59:20.495 output1.xml output2.xml
rebot --starttime 20080611-175920 --endtime 20080611-180242 *.xml
Removing keywords from outputs
Most of the content of output files comes from keywords and especially their log messages. When creating higher level reports, log files are not necessarily needed at all, and then keywords and their messages just take space unnecessarily. In these situations, the command line option --removekeywords can be used to dispose of unnecessary keywords. It has two possible values:
- ALL
- All keywords are unconditionally removed.
- PASSED
- Keywords are removed only from the passed test cases. In most cases, log files created after this contain enough information to investigate possible failures.
Removing keywords makes output files considerably smaller and thus faster to process further. Even when keywords are removed, names, arguments and statuses of top-level keywords are preserved, so it is still possible to create log files and see the high-level structure of each test case.
3.3.6 System log
Robot Framework has its own plain-text system log where it writes information about
- Processed and skipped test data files
- Imported test libraries, resource files and variable files
- Executed test suites and test cases
- Created outputs
Normally users never need this information, but it can be useful when investigating problems with test libraries or Robot Framework itself. A system log is not created by default, but it can be enabled by setting the environment variable ROBOT_SYSLOG_FILE so that it contains a path to the selected file.
A system log has the same log levels as a normal log file, with the exception that instead of FAIL it has the ERROR level. The threshold level to use can be altered using the ROBOT_SYSLOG_LEVEL environment variable.
#!/bin/bash

export ROBOT_SYSLOG_FILE=/tmp/syslog.txt
export ROBOT_SYSLOG_LEVEL=DEBUG

pybot --name Syslog_example path/to/tests
4 Extending Robot Framework
4.1 Creating test libraries
Robot Framework's actual testing capabilities are provided by test libraries. There are many existing libraries, some of which are even bundled with the core framework, but there is still often a need to create new ones. This task is not too complicated because, as this chapter illustrates, Robot Framework's library API is simple and straightforward.
4.1.1 Introduction
Supported programming languages
Robot Framework itself is written with Python, so naturally, test libraries extending it can be implemented using the same language. Additionally, it is possible to write libraries using Java, which requires running the framework on the Jython interpreter. Pure Python code works both on Python and Jython interpreters, assuming that it does not use syntax or libraries that are not available on Jython.
It is also possible to implement a test library with C by using Python C API. Another, and in most cases easier, method to interact with C code from a library is using Python's ctypes module.
Finally, it is possible to implement the actual test library functionality using any language and call that from a thin Python or Java wrapper library. Possible approaches include calling external scripts or tools through the operating system or using XML-RPC to connect the wrapper with the real implementation. The former approach is quite widely used and there is a proof-of-concept prototype also for the latter. The plan is to have XML-RPC support built in to Robot Framework in the future.
Different test library APIs
Robot Framework has three different test library APIs.
Static API
The simplest approach is having a module (in Python) or a class (in Python or Java) with methods the names of which map more or less directly to keyword names. Keywords also take the same arguments as the code implementing them. Keywords report failures with exceptions, log by writing to standard output and can return values using the return statement.
Dynamic API
Dynamic libraries are classes that implement a method to get the names of the keywords they implement, and another method to execute a named keyword with given arguments. The names of the keywords to implement, as well as how they are executed, can be determined dynamically at runtime, but reporting the status, logging and returning values is done similarly as in the static API.
Hybrid API
This is a hybrid between the static and the dynamic API. Libraries are classes with a method telling what keywords they implement, but those keywords must be available directly. Everything else except discovering what keywords are implemented is similar as in the static API.
All these APIs are described in this chapter. Everything is based on how the static API works, so its functions are discussed first. How the dynamic library API and the hybrid library API differ from it is then discussed in sections of their own.
The examples in this chapter are mainly about using Python, but they should be easy to understand also for Java-only developers. In those few cases where APIs have differences, both usages are explained with adequate examples.
4.1.2 Creating test library class or module
Test libraries can be implemented as Python modules or Python or Java classes. Using modules is possible only with the static API, and more complicated libraries are normally better implemented as classes even then.
Test library names
The name of a test library that is used when a library is imported is the same as the name of the module or class implementing it. For example, if you have a Python module MyLibrary (that is, the file MyLibrary.py), it will create a library with a name MyLibrary. Similarly, a Java class YourLibrary, when it is not in any package, creates a library with exactly that name.
Python classes are always inside a module. If the name of a class implementing a library is the same as the name of the module, Robot Framework allows dropping the module name when importing the library. For example, the class MyLib in the MyLib.py file can be used as a library with the name MyLib. If the module name and class name are different, libraries must be taken into use using both module and class names, such as mymodule.MyLibrary.
Java classes in a non-default package must be taken into use with the full name. For example, the class MyLib in the com.mycompany.myproject package must be imported with the name com.mycompany.myproject.MyLib.
Tip
If the library name is really long, for example when the Java package name is long, it is recommended to give the library a simpler alias by using the With Name syntax.
Providing arguments to test libraries
All test libraries implemented as classes can take arguments. These arguments are specified in the Setting table after the library name, and when Robot Framework creates an instance of the imported library, it passes them to its constructor. Libraries implemented as a module cannot take any arguments, so trying to use those results in an error.
The number of arguments needed by the library is the same as the number of arguments accepted by the library's constructor. The default values and variable number of arguments work similarly as with keyword arguments, with the exception that there is no variable argument support for Java libraries. Arguments passed to the library, as well as the library name itself, can be specified using variables, so it is possible to alter them, for example, from the command line.
| Setting | Value | Value | Value |
|---|---|---|---|
| Library | MyLibrary | 10.0.0.1 | 8080 |
| Library | AnotherLib | ${VAR} |
Example implementations, first one in Python and second in Java, for the libraries used in the above example:
from example import Connection

class MyLibrary:

    def __init__(self, host, port=80):
        self._conn = Connection(host, int(port))

    def send_message(self, message):
        self._conn.send(message)
public class AnotherLib {

    private String setting = null;

    public AnotherLib(String setting) {
        setting = setting;
    }

    public void doSomething() {
        if setting.equals("42") {
            // do something ...
        }
    }
}
Test library scope
Libraries implemented as classes can have an internal state, which can be altered by keywords and with arguments to the constructor of the library. Because the state can affect how keywords actually behave, it is important to make sure that changes in one test case do not accidentally affect other test cases. This kind of dependencies may create hard-to-debug problems, for example, when new test cases are added and they use the library inconsistently.
Robot Framework attempts to keep test cases independent from each other: by default, it creates new instances of test libraries for every test case. However, this behavior is not always desirable, because sometimes test cases should be able to share a common state. Additionally, all libraries do not have a state and creating new instances of them is simply not needed.
Test libraries can control when new libraries are created with a class attribute ROBOT_LIBRARY_SCOPE . This attribute must be a string and it can have the following three values:
- TEST CASE
- A new instance is created for every test case. A possible suite setup and suite teardown share yet another instance. This is the default.
- TEST SUITE
- A new instance is created for every test suite. The lowest-level test suites, created from test case files and containing test cases, have instances of their own, and higher-level suites all get their own instances for their possible setups and teardowns.
- GLOBAL
- Only one instance is created during the whole test execution and it is shared by all test cases and test suites. Libraries created from modules are always global.
When the TEST SUITE or GLOBAL scopes are used with test libraries that have a state, it is recommended that libraries have some special keyword for cleaning up the state. This keyword can then be used, for example, in a suite setup or teardown to ensure that test cases in the next test suites can start from a known state. For example, SeleniumLibrary uses the GLOBAL scope to enable using the same browser in different test cases without having to reopen it, and it also has the Close All Browsers keyword for easily closing all open browsers.
Example Python library using the TEST SUITE scope:
class ExampleLibrary:

    ROBOT_LIBRARY_SCOPE = 'TEST SUITE'

    def __init__(self):
        self._counter = 0

    def count(self):
        self._counter += 1
        print self._counter

    def clear_counter(self):
        self._counter = 0
Example Java library using the GLOBAL scope:
public class ExampleLibrary {

    public static String ROBOT_LIBRARY_SCOPE = "GLOBAL";

    private int counter = 0;

    public void count() {
        counter += 1;
        System.out.println(counter);
    }

    public void clearCounter() {
        counter = 0;
    }
}
4.1.3 Creating static keywords
Keyword names
When the static library API is used, Robot Framework uses reflection to find out what methods the library implements. With dynamic library API and hybrid library API, keyword names are got from the library directly. Naturally, Robot Framework can see only the public methods and it also excludes all methods starting with an underscore. With Java libraries, also methods that are implemented in java.lang.Object and not overridden are ignored.
Keyword names used in the test data are compared with method names to find the method implementing these keywords. Name comparison is case-insensitive, and also spaces and underscores are ignored. For example, the method hello maps to the keyword name Hello, hello or even h e l l o. Similarly both the do_nothing and doNothing methods can be used as the Do Nothing keyword in the test data.
Example Python library implemented as a module in the MyLibrary.py file:
def hello(name):
    print "Hello, %s!" % name

def do_nothing():
    pass
Example Java library implemented as a class in the MyLibrary.java file:
public class MyLibrary {

    public void hello(String name) {
        System.out.println("Hello, " + name + "!");
    }

    public void doNothing() {
    }

}
The example below illustrates how the example libraries above can be used. If you want to try this yourself, make sure that the library is in the library search path. Note that in the subsequent examples all boilerplates, such as taking a library into use and creating a test case, is excluded.
| Setting | Value | Value | Value |
|---|---|---|---|
| Library | MyLibrary |
| Test Case | Action | Argument | Argument |
|---|---|---|---|
| My Test | Do Nothing | ||
| Hello | world |
Keyword arguments
With a static and hybrid API, the information on how many arguments a keyword needs is got directly from the method that implements it. Libraries using the dynamic library API have other means for getting this information, so this section is not relevant to them.
The most common and also simplest situation is when a keyword needs an exact number of arguments. In this case, both the Python and Java methods simply take exactly those arguments. For example, a method implementing a keyword with no arguments takes no arguments either, a method implementing a keyword with one argument also takes one argument, and so on.
Example Python keywords taking different numbers of arguments:
def no_arguments():
    print "Keyword got no arguments"

def one_argument(arg):
    print "Keyword got one argument '%s'" % arg

def multiple_arguments(a1, a2, a3):
    print "Keyword got three arguments '%s', '%s' and '%s'" % (a1, a2, a3)
Default values
It is often useful that some of the arguments that a keyword uses have default values. Python and Java have different syntaxes for handling these kinds of situations, and the natural syntaxes of these languages can be used when creating test libraries for Robot Framework.
In Python, a method has always exactly one implementation and possible default values are specified in the method signature. The syntax, which is familiar to all Python programmers, is illustrated below:
def one_default(arg='default'):
    print "Argument has value '%s'" % arg

def multiple_defaults(arg1, arg2='default 1', arg3='default 2'):
    print "Got arguments %s, %s and %s" % (arg1, arg2, arg3)
The first example keyword above can be used either with zero or one arguments. If no arguments are given, arg gets the value default. If there is one argument, arg gets that value, and calling the keyword with any other number of arguments fails. In the second example, one argument is always required, but the second and the third one have default values, so it is possible to use the keyword with one to three arguments.
In Java, one method can have several implementations with different signatures. Robot Framework regards all these implementations as one keyword, which can be used with different arguments. This syntax can thus be used to provide support for the default values. This is illustrated by the examples below, identical to the earlier Python examples:
public void oneDefault(String arg) {
    System.out.println("Argument has value '" + arg "'");
}

public void oneDefault() {
    oneDefault("default");
}

public void multipleDefaults(String arg1, String arg2, String arg3) {
    System.out.println("Got arguments " + arg1 + ", " + arg2 + " and " + arg3);
}

public void multipleDefaults(String arg1, String arg2) {
    multipleDefaults(arg1, arg2, "default 2");
}

public void multipleDefaults(String arg1) {
    multipleDefaults(arg1, "default 1");
}
The keywords above can be used in the test data as illustrated in the example below:
| Test Case | Action | Argument | Argument | Argument |
|---|---|---|---|---|
| Defaults | One Default | |||
| One Default | argument | |||
| Multiple Defaults | required arg | |||
| Multiple Defaults | required arg | optional | ||
| Multiple Defaults | required arg | optional 1 | optional 2 |
Variable number of arguments
Robot Framework supports also keywords that take any number of arguments. Similarly as with the default values, the actual syntax to use in test libraries is different in Python and Java.
Python itself has a good support for methods accepting any number of arguments. The same syntax works in libraries and, as the examples below show, it can also be combined with other ways of specifying arguments:
def any_arguments(*args):
    print "Got arguments:"
    for arg in args:
        print arg

def one_required(required, *others):
    print "Required: %s\nOthers:" % required
    for arg in others:
        print arg

def also_defaults(req, def1="default 1", def2="default 2", *rest):
    print req, def1, def2, rest
In Java, there is no syntax for a variable number of arguments, but Robot Framework has its own support for them. If the last argument in a keyword signature is an array, all leftover arguments are packed into it. This also works, if the keyword is used with one argument less than the actual number of arguments in the signature - in this case the array at the end will be empty.
This system has one limitation: it only works if the method has one signature. Thus it is not possible to have a Java keyword that has both the default values and a variable number of arguments. Of course, having the required values with a variable number of arguments is possible, as the examples below illustrate:
public void anyArguments(String[] args) {
    System.out.println("Got arguments:");
    for (int i; i < args.length; i++) {
        System.out.println(args[i]);
    }
}

public void oneRequired(String required, String[] others) {
    System.out.println("Required: " + required + "\nOthers:");
    for (int i; i < others.length; i++) {
        System.out.println(others[i]);
    }
}
Finally, here are examples on how keywords in the examples above can be used in the test data. Note that the last examples do not work with Java because of the limitations explained above.
| Test Case | Action | Argument | Argument | Argument |
|---|---|---|---|---|
| Varargs | Any Arguments | |||
| Any Arguments | argument | |||
| Any Arguments | arg 1 | arg 2 | arg 2 | |
| ... | arg 4 | arg 5 | ||
| One Required | required arg | |||
| One Required | required arg | another arg | yet another | |
| Also Defaults | required | |||
| Also Defaults | required | these two | have defaults | |
| Also Defaults | 1 | 2 | 3 | |
| ... | 4 | 5 | 6 |
Argument types
Robot Framework does not do any argument-type checking when it uses keywords. Because arguments in Python do not have any type, calling a Python method implementing a keyword always succeeds, but the execution fails later, if the given arguments are incompatible. Java arguments are typed, and using a Java keyword with incompatible arguments causes a TypeError at the calling time. However, Jython does some argument coercion automatically. So, for example, a method expecting double can be called with any number, but not with a string.
4.1.4 Communicating with Robot Framework
After a method implementing a keyword is called, it can use any mechanism to communicate with the system under test. It can then also send messages to Robot Framework's log file, return information that can be saved to variables and, most importantly, report if the keyword passed or not.
Reporting keyword status
Reporting keyword status is done simply using exceptions. If a method raises an exception, the keyword status is FAIL, and if it returns normally, the status is PASS.
The error message shown in logs, reports and the console is created from the exception type and its message. With generic exceptions (for example, AssertionError, Exception, and RuntimeError), only the exception message is used, and with others, the message is created in the format ExceptionType: Actual message. In both cases, it is important for the users that the exception message is as informative as possible.
If the error message is longer than 20 lines, it will be automatically cut from the middle to prevent reports from getting too long and difficult to read. The full error message is always shown in the log message of the failed keyword, so it is not lost even if this happens.
Logging information
Exception messages are not the only way to give information to the users. In addition to that, methods can also send messages to log files simply by writing to standard output (stdout) or standard error (stderr), and they can even use different log levels.
By default, everything written by a method to stdout is written into a log file as a single entry with the log level INFO. Messages written into stderr are handled similarly otherwise, but they are echoed back to the original stderr after the keyword execution has finished.
To use other log levels than INFO, or to create several messages, specify the log level explicitly by embedding the level into the message in the format *LEVEL* Actual log message, where *LEVEL* must be in the beginning of a line and LEVEL is one of the available logging levels TRACE, DEBUG, INFO and WARN.
Everything normally logged by the library will be converted into a format that can be safely represented as HTML. For example, <b>foo</b> will be displayed in the log exactly like that and not as foo. If libraries want to use formatting, links, display images and so on, they can use a special pseudo log level HTML. Robot Framework will write these messages directly into the log with the INFO level, so they can use any HTML syntax they want. However, this feature needs to be used with care, because one badly placed </table> tag can ruin the log file quite badly.
The following examples clarify how logging with different levels works. Java programmers should regard the code print 'message' as pseudocode meaning System.out.println("message");.
print 'Hello from a library.'
print '*WARN* Warning from a library.'
print '*INFO* Hello again!'
print 'This will be part of the previous message.'
print '*INFO* This is a new message.'
print '*INFO* This is <b>normal text</b>.'
print '*HTML* This is <b>bold</b>.'
print '*HTML* <a href="http://robotframework.org">Robot Framework</a>'
In most cases, the INFO level is adequate. The levels below it, DEBUG and TRACE, are useful for writing debug information. These messages are normally not shown, but they can facilitate debugging possible problems in the library itself. The WARN level can be used to make messages slightly more visible.
Returning values
The final way for keywords to communicate back to the core framework is returning information retrieved from the system under test or generated by some other means. The returned values can be assigned to variables in the test data and then used as inputs for other keywords, even from different test libraries.
Values are returned using the return statement both from the Python and Java methods. Normally, one value is assigned into one scalar variable, as illustrated in the example below. This example also illustrates that it is possible to return any objects and to use extended variable syntax to access object attributes.
from mymodule import MyObject

def return_string():
    return "Hello, world!"

def return_object(name):
    return MyObject(name)
| ${string} = | Return String | |
| Should Be Equal | ${string} | Hello, world! |
| ${object} = | Return Object | Robot |
| Should Be Equal | ${object.name} | Robot |
Keywords can also return values so that they can be assigned into several scalar variables at once, into a list variable, or into scalar variables and a list variable. All these usages require that returned values are Python lists or tuples or, since Robot 1.8.6, Java arrays. If there is a need, support for other iterables can be added in the future.
def return_two_values():
    return 'first value', 'second value'

def return_multiple_values():
    return ['a', 'list', 'of', 'strings']
| ${var1} | ${var2} = | Return Two Values | |
| Should Be Equal | ${var1} | first value | |
| Should Be Equal | ${var2} | second value | |
| @{list} = | Return Two Values | ||
| Should Be Equal | @{list}[0] | first value | |
| Should Be Equal | @{list}[1] | second value | |
| ${s1} | ${s2} | @{li} = | Return Multiple Values |
| Should Be Equal | ${v1} ${v2} | a list | |
| Should Be Equal | @{li}[0] @{li}[1] | of strings |
4.1.5 Distributing test libraries
Documenting libraries
A test library without documentation about what keywords it contains and what those keywords do is rather useless. To ease maintenance, it is highly recommended that library documentation is included in the source code and generated from it. Basically, that means using docstrings with Python and Javadoc with Java, as in the examples below.
class MyLibrary:
    """This is an example library with some documentation."""

    def keyword_with_short_documentation(self, argument):
        """This keyword has only a short documentation"""
        pass

    def keyword_with_longer_documentation(self):
        """First line of the documentation is here.

        Longer documentation continues here and it can contain
        multiple lines or paragraphs.
        """
        pass
/**
 *  This is an example library with some documentation.
 */
public class MyLibrary {

    /**
     * This keyword has only a short documentation
     */
    public void keywordWithShortDocumentation(String argument) {
    }

    /**
     * First line of the documentation is here.
     *
     * Longer documentation continues here and it can contain
     * multiple lines or paragraphs.
     */
    public void keywordWithLongerDocumentation() {
    }

}
Both Python and Java have tools for creating an API documentation of a library documented as above. However, outputs from these tools can be slightly technical for some users. Another alternative is using Robot Framework's own documentation tool libdoc.py. This tool can create a library documentation from both Python and Java libraries using the static library API, such as the ones above, but it also handles libraries using the dynamic library API and hybrid library API.
The first line of a keyword documentation is used for a special purpose and should contain a short overall description of the keyword. It is used as a short documentation, for example as a tool tip, by libdoc.py and also shown in the test logs. However, the latter does not work with Java libraries using the static API, because their documentations are lost in compilation and not available at runtime.
Testing libraries
Any non-trivial test library needs to be thoroughly tested to prevent bugs in them. Of course, this testing should be automated to make it easy to rerun tests when libraries are changed.
Both Python and Java have excellent unit testing tools, and they suite very well for testing libraries. There are no major differences in using them for this purpose compared to using them for some other testing. The developers familiar with these tools do not need to learn anything new, and the developers not familiar with them should learn them anyway.
It is also easy to use Robot Framework itself for testing libraries and that way have actual end-to-end acceptance tests for them. There are plenty of useful keywords in the BuiltIn library for this purpose. One worth mentioning specifically is Run Keyword And Expect Error, which is useful for testing that keywords report errors correctly.
Whether to use a unit- or acceptance-level testing approach depends on the context. If there is a need to simulate the actual system under test, it is often easier on the unit level. On the other hand, acceptance tests ensure that keywords do work through Robot Framework. If you cannot decide, of course it is possible to use both the approaches.
Packaging libraries
After a library is implemented, documented, and tested, it still needs to be distributed to the users. With simple libraries consisting of a single file, it is often enough to ask the users to copy that file somewhere and set the library search path accordingly. With more complicated libraries, package them to make the installation easier.
Since libraries are normal programming code, they can be packaged using normal packaging tools. With Python, good options include distutils, contained by Python's standard library, and the newer setuptools. A benefit of these tools is that library modules are installed into a location that is automatically in the library search path.
When using Java, it is natural to package libraries into a JAR archive. The JAR package must be put into the library search path before running tests, but it is easy to create a start-up script that does that automatically.
4.1.6 Dynamic library API
The dynamic API is in most ways similar to the static API. For example, reporting the keyword status, logging and returning values works exactly the same way. Most importantly, there are no differences in importing dynamic libraries and using their keywords compared to other libraries, so you do not even need to know what APIs the libraries use.
The only difference between static and dynamic libraries is the way how Robot Framework discovers what keywords the library implements, what arguments and documentation they have and how those keywords are actually executed. With the static API, all this is done using reflection (except for the documentation of Java libraries), but dynamic libraries have special methods that are used for these purposes.
One of the benefits of the dynamic API is that you have more flexibility in organizing your library. With the static API, you have all keywords in one class (or module), whereas with the dynamic API, you can, for example, implement each keyword as a separate class, if you want. This use case is not so important with Python, because its dynamic capabilities and multi-inheritance already give plenty of flexibility and the hybrid library API is usually a better option.
Another major use case for the dynamic API is implementing a library so that it is only a proxy for an actual library on some other computer or another JVM. This kind of a proxy library can be very thin, and because keyword names are got dynamically, there is no need to update the proxy when new keywords are added into the actual library.
This section explains how the dynamic API works between Robot Framework and dynamic libraries. It does not matter for Robot Framework how these libraries are actually implemented (for example, how calls to the run_keyword method are mapped to a correct keyword implementation), and many different approaches are possible. However, if you use Java, you may want to examine javalib-core before implementing your own system. This reusable component has several ways of creating keywords, and it is likely that it already has a mechanism that suites your needs.
Getting keyword names
Dynamic libraries tell what keywords they implement with the get_keyword_names method. The method also has the alias getKeywordNames that is recommended when writing Java. This method cannot take any arguments, and it must return a list of strings (in Python) or a string array (in Java) containing the names of the keywords that the library implements.
If the returned keyword names contain several words, they can be returned separated with spaces or underscores, or in the camelCase format. For example, ['first keyword', 'second keyword'], ['first_keyword', 'second_keyword'], and ['firstKeyword', 'secondKeyword'] would all result in the keywords First Keyword and Second Keyword.
Dynamic libraries must always have this method. If it is missing, or if calling it fails for some reason, the library is considered a static library, instead.
Running keywords
Dynamic libraries have a special run_keyword (alias runKeyword) method for executing their keywords. When a keyword from a dynamic library is used in the test data, Robot Framework uses the library's run_keyword method to get it executed. This method takes two arguments. The first argument is a string containing the name of the keyword to be executed in the same format as returned by get_keword_names. The second argument is a list of arguments (an object array in Java) given to the keyword in the test data.
After the library has got the keyword name and arguments, it can execute the keyword freely, but it must use the same mechanism to communicate with the framework as static libraries. This means using exceptions for reporting keyword status, logging by writing to the standard output and using the return statement in run_keyword for returning something.
Every dynamic library must have both the get_keyword_names and run_keyword methods. The rest of the methods in the dynamic API are optional, so the example below shows a working (albeit trivial) dynamic library.
class DynamicExample:

    def get_keyword_names(self):
        return ['first keyword', 'second keyword']

    def run_keyword(self, name, args):
        print "Running keyword %s with arguments %s" % (name, args)
Getting keyword arguments
If a dynamic library only implements the get_keyword_names and run_keyword methods, Robot Framework does not have any information about the arguments that the implemented keywords need. For example, both First Keyword and Second Keyword in the example above could be used with any number of arguments. This is problematic, because most real keywords expect a certain number of keywords, and under these circumstances they would need to check the argument counts themselves.
Starting from Robot Framework version 1.8.4, dynamic libraries can tell Robot Framework what arguments the keywords that it implements actually expect. This is done with the get_keyword_arguments (alias getKeywordArguments) method, which takes the name of a keyword as an argument and returns a list of strings (a string array in Java) containing the arguments accepted by that keyword.
Similarly as static keywords, dynamic keywords can require any number of arguments, have default values and accept a variable number of arguments. The syntax for how to represent all these different situations is explained in the following table. Note that the examples use Python lists of strings, but Java developers should be able to translate them to string arrays.
| Expected arguments | How to represent | Examples | Min / Max |
|---|---|---|---|
| No arguments | Empty list. | [] | 0/0 |
| One or more argument | List of strings containing argument names. | ['one_argument'], ['a1', 'a2', 'a3'] | 1/1, 3/3 |
| Default values for arguments | Default values separated from names with =. Default values are always considered to be strings. | ['arg=default value'], ['a', 'b=1', 'c=2'] | 0/1, 1/3 |
| Variable number of arguments | Last argument has * before its name. | ['*arguments'], ['a', 'b=42', '*rest'] | 0/any, 1/any |
When the get_keyword_arguments is used, Robot Framework automatically calculates how many arguments the keywords require. If a keyword is used with an invalid number of arguments, an error occurs and run_keyword is not even called. The last column of the table above shows the minimum and maximum argument counts calculated from the presented examples.
The actual argument names do not matter when tests are executed, because only argument counts are of concern to Robot Framework. On the other hand, if the libdoc.py tool is used for documenting the library, arguments are shown in the documentation, in which case they need to have meaningful names.
Getting keyword documentation
The final special method that dynamic libraries can implement is get_keyword_documentation (alias getKeywordDocumentation). It takes a keyword name as an argument and, as the method name implies, returns its documentation as a string. This method also only works starting from Robot Framework version 1.8.4.
The returned documentation is used similarly as the keyword documentation string with static libraries implemented with Python. The main use case is getting keywords' documentations into a library documentation generated with libdoc.py. Additionally, the first line of the documentation (until the first \n) is shown in test logs.
Summary
All special methods in the dynamic API are listed in the table below. Method names are listed in the underscore format, but their camelCase aliases function in exactly the same way.
| Name | Arguments | Purpose |
|---|---|---|
| get_keyword_names | To return names of implemented keywords. | |
| run_keyword | name, arguments | To execute the specified keyword with given arguments. |
| get_keyword_arguments | name | To return keyword's argument specification. Optional. |
| get_keyword_documentation | name | To return keyword's documentation. Optional. |
It is possible to write a formal interface specification in Java, as below. However, remember that libraries do not need to implement any explicit interface, because Robot Framework directly checks if the library has the required get_keyword_names and run_keyword methods. Additionally, get_keyword_arguments and get_keyword_documentation are completely optional.
public interface RobotFrameworkDynamicAPI {

    String[] getKeywordNames();

    Object runKeyword(String name, Object[] arguments);

    String[] getKeywordArguments(String name);

    String getKeywordDocumentation(String name);

}
4.1.7 Hybrid library API
The hybrid library API is, as its name implies, a hybrid between the static API and the dynamic API. Just as with the dynamic API, it is possible to implement a library using the hybrid API only as a class.
Getting keyword names
Keyword names are got in the exactly same way as with the dynamic API. In practice, the library needs to have the get_keyword_names or getKeywordNames method returning a list of keyword names that the library implements.
Running keywords
In the hybrid API, there is no run_keyword method for executing keywords. Instead, Robot Framework uses reflection to find methods implementing keywords, similarly as with the static API. A library using the hybrid API can either have those methods implemented directly or, more importantly, it can handle them dynamically.
In Python, it is easy to handle missing methods dynamically with the __getattr__ method. This special method is probably familiar to most Python programmers and they can immediately understand the following example. Others may find it easier to consult Python Reference Manual first.
from somewhere import external_keyword

class HybridExample:

    def get_keyword_names(self):
        return ['my_keyword', 'external_keyword']

    def my_keyword(self, arg):
        print "My Keyword called with '%s'" % arg

    def __getattr__(self, name):
        if name == 'external_keyword':
            return external_keyword
        raise AttributeError("Non-existing attribute '%s'" % name)
Note that __getattr__ does not execute the actual keyword like run_keyword does with the dynamic API. Instead, it only returns a callable object that is then executed by Robot Framework.
Another point to be noted is that Robot Framework uses the same names that are returned from get_keyword_names for finding the methods implementing them. Thus the names of the methods that are implemented in the class itself must be returned in the same format as they are defined. For example, the library above would not work correctly, if get_keyword_names returned My Keyword instead of my_keyword.
The hybrid API is not very useful with Java, because it is not possible to handle missing methods with it. Of course, it is possible to implement all the methods in the library class, but that brings few benefits compared to the static API.
Getting keyword arguments and documentation
When this API is used, Robot Framework uses reflection to find the methods implementing keywords, similarly as with the static API. After getting a reference to the method, it searches for arguments and documentation from it, in the same way as when using the static API. Thus there is no need for special methods for getting arguments and documentation like there is with the dynamic API.
Summary
When implementing a test library in Python, the hybrid API has the same dynamic capabilities as the actual dynamic API. A great benefit with it is that there is no need to have special methods for getting keyword arguments and documentation. It is also often practical that the only real dynamic keywords need to be handled in __getattr__ and others can be implemented directly in the main library class.
Because of the clear benefits and equal capabilities, the hybrid API is in most cases a better alternative than the dynamic API when using Python. One notable exception is implementing a library as a proxy for an actual library implementation elsewhere, because then the actual keyword must be executed elsewhere and the proxy can only pass forward the keyword name and arguments.
A good example of using the hybrid API is Robot Framework's own Telnet library.
4.2 Using listener interface
Robot Framework has a listener interface that can be used to receive notifications about test execution. Listeners are classes with certain special methods, and they can be implemented both with Python and Java. Example uses of the listener interface include external test monitors, sending a mail message when a test fails, and communicating with other systems.
4.2.1 Taking listeners into use
Listeners are taken into use from the command line with the --listener option, so that the name of the listener is given to it as an argument. The listener name is got from the name of the class implementing the listener interface, similarly as test library names are got from classes implementing them. The specified listeners must be in the same module search path where test libraries are searched from when they are imported. It is possible to take multiple listeners into use by using this option several times.
Examples:
pybot --listener MyListener tests.html
pybot --listener module.Listener --listener AnotherListener tests.html
jybot --listener com.company.package.Listener tests.html
4.2.2 Available listener interface methods
Robot Framework creates an instance of the listener class when test execution starts. No arguments are given to the constructor of the listener class. During the test execution, Robot Framework calls listeners' methods when test suites and cases start and end. It also calls the appropriate methods when output files are ready, and finally at the end it calls the close method. A listener is not required to implement any official interface, and it only needs to have the methods it actually needs.
The following table lists all the available methods in the listener interface. All of these methods have also camelCase aliases. Thus, for example, startSuite is a synonym to start_suite. All the arguments are strings, unless otherwise stated in the Comments column.
| Method | Arguments | Comments |
|---|---|---|
| start_suite | name, doc | The documentation may be empty. |
| end_suite | status, message | The status is either PASS or FAIL. The message contains suite statistics and an error message, if the suite setup or teardown has failed. |
| start_test | name, doc, tags | The documentation may be empty. Tags are given as a list of strings in Python and as a string array in Java. |
| end_test | status, message | The status is either PASS or FAIL. The message contains an error message, if the test has failed and is empty otherwise. |
| output_file | path | Called when writing to an output file is finished. The path is an absolute path to the file. When outputs are split, called for each finished file. |
| log_file | path | Called when writing to a log file is finished. The path is an absolute path to the file. When outputs are split, called for each finished file. |
| report_file | path | Called when writing to a report file is finished. The path is an absolute path to the file. |
| summary_file | path | Called when writing to a summary file is finished. The path is an absolute path to the file. |
| debug_file | path | Called when writing to a debug file is finished. The path is an absolute path to the file. |
| close | Called after all test suites, and test cases in them, have been executed. |
The available methods and their arguments are also shown in a formal Java interface specification below. It should be remembered that a listener does not need to implement any explicit interface or have all these methods.
public interface RobotListenerInterface {

    void startSuite(String name, String doc);

    void endSuite(String status, String message);

    void startTest(String name, String doc, String[] tags);

    void endTest(String status, String message);

    void outputFile(String path);

    void logFile(String path);

    void reportFile(String path);

    void summaryFile(String path);

    void debugFile(String path);

    void close();
}
4.2.3 Listener examples
The first simple example is implemented with Python. It mainly illustrates that using the listener interface is not very complicated.
class SimpleListener:

    def start_test(self, name, documentation, tags):
        print 'Executing test', name

    def log_file(self, path):
        print 'Test log available at', path

    def close(self):
        print 'All tests executed'
The second example, which still uses Python, is slightly more complicated. It writes all the information it gets into a text file in a temporary directory without much formatting. Note that in real usage, the debug file functionality available through the command line option --debugfile is probably more useful than this example.
import os.path
import tempfile


class PythonListener:

    def __init__(self):
        outpath = os.path.join(tempfile.gettempdir(), 'listen.txt')
        self.outfile = open(outpath, 'w')

    def start_suite(self, name, doc):
        self.outfile.write("%s '%s'\n" % (name, doc))

    def start_test(self, name, doc, tags):
        self.outfile.write("- %s '%s' [ %s ] :: " % (name, doc, ' '.join(tags)))

    def end_test(self, status, message):
        if status == 'PASS':
            self.outfile.write('PASS\n')
        else:
             self.outfile.write('FAIL: %s\n' % message)

     def end_suite(self, status, message):
         self.outfile.write('%s\n%s\n' % (status, message))

     def close(self):
         self.outfile.close()
The third example implements the same functionality as the previous one, but uses Java instead of Python.
import java.io.*;


public class JavaListener {

    BufferedWriter outfile = null;

    public JavaListener() throws IOException {
        String tmpdir = System.getProperty("java.io.tmpdir");
        String sep = System.getProperty("file.separator");
        String outpath = tmpdir + sep + "listen_java.txt";
        outfile = new BufferedWriter(new FileWriter(outpath));
    }

    public void startSuite(String name, String doc) throws IOException {
        outfile.write(name + " '" + doc + "'\n");
    }

    public void startTest(String name, String doc, String[] tags) throws IOException {
        outfile.write("- " + name + " '" + doc + "' [ ");
        for (int i=0; i < tags.length; i++) {
           outfile.write(tags[i] + " ");
        }
        outfile.write(" ] :: ");
    }

    public void endTest(String status, String message) throws IOException {
        if (status.equals("PASS")) {
            outfile.write("PASS\n");
        }
        else {
            outfile.write("FAIL: " + message + "\n");
        }
    }

    public void endSuite(String status, String message) throws IOException {
        outfile.write(status + "\n" + message + "\n");
    }

    public void close() throws IOException {
        outfile.close();
    }

}
4.3 Using internal APIs
Robot Framework has some public APIs which are intended to help in developing supporting tools or extending the processing of input or output data. These APIs are implemented as Python modules, and as such can only be used from Python and Jython scripts and programs.
Unfortunately, these APIs are not particularly well documented, and are subject to change and refinement in the future. The plan is to enhance the documentation in the future, but before that the options for getting more information are asking help from Robot Framework developers, investigating existing supporting tools that use these APIs, or just taking a look at the source code of Robot Framework.
4.3.1 Executed test data
This API consists of a method for reading Robot Framework output file(s) into a TestSuite object that contains all the relevant information about the results of the test execution. Signature of method is TestSuite(outpath), where outpath is a path to an existing output file. The returned TestSuite object can be used to process the results of the test run.
Here is an example that reads a given output file and marks each test case whose execution time is longer than three minutes failed. The TestSuite object is then serialized and normal log and report files could be generated with rebot.
#!/usr/bin/env python

"""Usage: check_test_times.py inpath [outpath]

Reads result of a test run from Robot output file and checks that no test
took longer than 3 minutest to execute. If outpath is not given, the
result is written over the original file.
"""

import sys
from robot.output import TestSuite


def check_tests(inpath, outpath=None):
    print inpath, outpath
    if outpath is None:
        outpath = inpath
    suite = TestSuite(inpath)
    _check_execution_times(suite)
    suite.write_to_file(outpath)

def _check_execution_times(suite):
    for test in suite.tests:
        if test.status == 'PASS' and test.elapsedmillis > 1000 * 60 * 3:
            test.status = 'FAIL'
            test.message = 'Test execution time was too long: %s' % test.elapsedtime
    for suite in suite.suites:
        _check_execution_times(suite)


if __name__ == '__main__':
    if not len(sys.argv) in [2,3]:
        print __doc__
        exit(1)
    check_tests(*sys.argv[1:])
4.3.2 Test execution
This API consists of run method, which can be used for starting the test execution. Signature of the method is run(*datasources, **options), where datasources are paths to files and directories to be executed and options are same as normal command line options without hyphens.
Example:
from robot import run

run('tests.html', log='mylog.html', include=['tag1', 'tag2'])
Equivalent command line usage would be:
pybot --log mylog.html --include tag1 --include tag2 tests.html
Warning
This method can be used only once in a given context. This problem will be fixed in future releases.
4.3.3 Parsed test data
This API consists of a method for getting a TestSuite object that contains parsed test data. The method is used like TestSuite(*datasources, **options), where datasources are paths to files and directories containing the test data, and options are same as normal command line options without hyphens.
Example:
from robot.parsing import TestSuite

suite = TestSuite('path/to/tests.html', process_curdir=False)
print suite.name
for test in suite.tests:
    print test.name
process_curdir is a special option, and when False, the variable ${CURDIR} is not replaced when parsing the data. Robot IDE uses this option when it parses the input data. See Built-in variables for more information about ${CURDIR}.
4.3.4 Runnable test data
This API consists of a method for parsing given input files into a runnable TestSuite object. This differs from a parsed TestSuite in that variables and settings for suite(s) are processed.
The signature of this TestSuite method is TestSuite(datasources, settings, syslog) , where data sources are paths to files and directories, similarly as when running pybot/jybot from the command line.
5 Appendices
5.1 All available settings in test data
5.1.1 Setting table
The Setting table is used to import test libraries, resource files and variable files and to define metadata for test suites and test cases. It can be included in test case files and resource files. Note that in a resource file, a Setting table can only include settings for importing libraries, resources, and variables.
| Name | Description |
|---|---|
| Library | Used for taking test libraries into use. |
| Resource | Used for taking resource files into use. |
| Variables | used for taking variable files into use. |
| Documentation | Used for specifying a test suite documentation. |
| Meta: <name> | Used for setting free test suite metadata. |
| Suite Setup | Used for specifying the suite setup. |
| Suite Teardown | Used for specifying the suite teardown. |
| Suite Precondition | A synonym for Suite Setup. |
| Suite Postcondition | A synonym for Suite Teardown. |
| Force Tags | Used for specifying forced values for tags when tagging test cases. |
| Default Tags | Used for specifying default values for tags when tagging test cases. |
| Test Setup | Used for specifying a default test setup. |
| Test Teardown | Used for specifying a default test teardown. |
| Test Precondition | A synonym for Test Setup. |
| Test Postcondition | A synonym for Test Teardown. |
| Test Timeout | Used for specifying a default test case timeout. |
5.1.2 Test Case table
The settings in the Test Case table are always specific to the test case for which they are defined. Some of these settings override the default values defined in the Settings table.
| Name | Description |
|---|---|
| [Documentation] | Used for specifying a test case documentation. |
| [Tags] | Used for tagging test cases. |
| [Setup] | Used for specifying a test setup. |
| [Teardown] | Used for specifying a test teardown. |
| [Precondition] | A synonym for [Setup]. |
| [Postcondition] | A synonym for [Teardown]. |
| [Timeout] | Used for specifying a test case timeout. |
5.1.3 Keyword table
Settings in the Keyword table are specific to the user keyword for which they are defined.
| Name | Description |
|---|---|
| [Documentation] | Used for specifying a user keyword documentation. |
| [Arguments] | Used for specifying user keyword arguments. |
| [Return] | Used for specifying user keyword return values. |
| [Timeout] | Used for specifying a user keyword timeout. |
5.2 All command line options
This appendix lists all the command line options that are available when executing test cases with pybot or jybot, and when post-processing outputs with rebot.
5.2.1 Command line options for test execution
-N, --name <name> Sets the name of the top-level test suite. -D, --doc <document> Sets the documentation of the top-level test suite. -M, --metadata <name:value> Sets free metadata for the top level test suite. -G, --settag <tag> Sets the tag(s) to all executed test cases. -t, --test <name> Selects the test cases by name. -s, --suite <name> Selects the test suites by name. -i, --include <tag> Selects the test cases by tag. -e, --exclude <tag> Selects the test cases by tag. -c, --critical <tag> Tests that have the given tag are considered critical. -n, --noncritical <tag> Tests that have the given tag are not critical. --runmode <mode> Sets the execution mode for this test run. -v, --variable <name:value> Sets individual variables in the test data. -V, --variablefile <path> Sets variables using variable files. -d, --outputdir <dir> Defines where to create output files. -o, --output <file> Sets the path to the generated output file. -l, --log <file> Sets the path to the generated log file. -r, --report <file> Sets the path to the generated report file. -S, --summary <file> Sets the path to the generated summary file. -b, --debugfile <file> The debug file that is written during execution. -T, --timestampoutputs Adds a timestamp to all output files. --splitoutputs <level> Splits output and log files. --logtitle <title> Sets a title for the generated test log. --reporttitle <title> Sets a title for the generated test report. --summarytitle <title> Sets a title for the generated summary report. -L, --loglevel <level> Sets the threshold level for logging. --suitestatlevel <level> Defines how many levels to show in the Statistics by Suite table in outputs. --tagstatinclude <tag> Includes only these tags in the Statistics by Tag and Test Details by Tag tables in outputs. --tagstatexclude <tag> Excludes these tags from the Statistics by Tag and Test Details by Tag tables in outputs. --tagstatcombine <tags> Creates combined statistics based on tags. --tagdoc <pattern:doc> Adds documentation to the specified tags. --tagstatlink <pattern:link:title> Adds external links to the Statistics by Tag table in outputs. --listener <class> Sets a listener for monitoring test execution. -W, --monitorwidth <chars> Sets the width of the monitor output. -C, --monitorcolors <on|off|force> Specifies are colors used in the console. -P, --pythonpath <path> Additional locations where to search test libraries from when they are imported. -E, --escape <what:with> Escapes characters that are problematic in the console. -A, --argumentfile <path> A text file to read more arguments from. -h, --help Prints usage instructions. --version Prints the version information.
5.2.2 Command line options for post-processing outputs
-N, --name <name> Sets the name of the top level test suite. -D, --doc <document> Sets the documentation of the top-level test suite. -M, --metadata <name:value> Sets free metadata for the top-level test suite. -G, --settag <tag> Sets the tag(s) to all processed test cases. -t, --test <name> Selects the test cases by name. -s, --suite <name> Selects the test suites by name. -i, --include <tag> Selects the test cases by tag. -e, --exclude <tag> Selects the test cases by tag. -c, --critical <tag> Tests that have the given tag are considered critical. -n, --noncritical <tag> Tests that have the given tag are not critical. -d, --outputdir <dir> Defines where to create output files. -o, --output <file> Sets the path to the generated output file. -l, --log <file> Sets the path to the generated log file. -r, --report <file> Sets the path to the generated report file. -S, --summary <file> Sets the path to the generated summary file. -T, --timestampoutputs Adds a timestamp to all output files. --splitoutputs <level> Splits output and log files. --logtitle <title> Sets a title for the generated test log. --reporttitle <title> Sets a title for the generated test report. --summarytitle <title> Sets a title for the generated summary report. --suitestatlevel <level> Defines how many levels to show in the Statistics by Suite table in outputs. --tagstatinclude <tag> Includes only these tags in the Statistics by Tag and Test Details by Tag tables in outputs. --tagstatexclude <tag> Excludes these tags from the Statistics by Tag and Test Details by Tag tables in outputs. --tagstatcombine <tags> Creates combined statistics based on tags. --tagdoc <pattern:doc> Adds documentation to the specified tags. --tagstatlink <pattern:link:title> Adds external links into the Statistics by Tag table in outputs. --removekeywords <all|passed> Removes keyword data from the generated outputs. --starttime <timestamp> Sets the starting time of test execution when creating combined reports. --endtime <timestamp> Sets the ending time of test execution when creating combined reports. -E, --escape <what:with> Escapes characters that are problematic in the console. -A, --argumentfile <path> A text file to read more arguments from. -h, --help Prints usage instructions. --version Prints the version information.
5.3 Supporting tools
In this appendix, the available supporting tools for Robot Framework are described. Unless otherwise stated later in this chapter, the tools can be downloaded from the Robot Framework supporting tools page.
- 5.3.1 Internal tools
- Library documentation tool -- libdoc.py
- Historical reporting tool -- risto.py
- Test data tidying tool -- robotidy.py
- Test result diffing tool -- robotdiff.py
- Execution time reporting tool -- times2csv.py
- File viewing tool -- fileviewer.py
- One click installer
- Test status checker tool -- statuschecker.py
- 5.3.2 External tools
5.3.1 Internal tools
Library documentation tool -- libdoc.py
libdoc.py is tool for generating HTML or XML documentation from keywords of a test library or a resource file.
Historical reporting tool -- risto.py
risto.py is a tool for generating graphs about historical statistics of test executions.
Test data tidying tool -- robotidy.py
robotidy.py is a tool for cleaning Robot Framework test data, changing test data format between HTML and TSV and fixing inline comments to format supported by Robot IDE.
Test result diffing tool -- robotdiff.py
robotdiff.py is a tool for generating diff reports from Robot Framework output files.
Execution time reporting tool -- times2csv.py
times2csv.py is a tool for generating start, end and elapsed time information about suites, tests and keywords in CSV format.
File viewing tool -- fileviewer.py
fileviewer.py is a graphical tool implementing UNIX tail -like functionality. It is especially designed to view debug files
One click installer
One click installer is an AutoIT script that installs Robot Framework and its dependencies.
Test status checker tool -- statuschecker.py
statuschecker.py is a tool for verifying that test case statuses and messages and also keyword log messages are as expected.
5.3.2 External tools
Test data editing tool (Robot IDE)
Robot IDE is a standalone tool for editing test data. It helps in creating, editing and maintaining of Robot Framework test data.
More information will be added as soon as Robot IDE project is made publicly available.
Manual test execution tool (mabot)
mabot is a standalone tool for reporting manual test execution results. It enables storing and reporting manual test cases along with automated Robot Framework test cases.
More information will be added as soon as mabot project is made publicly available.
Core for Java test libraries
Javalib-core is an external component that simplifies creation of larger Java test libraries by offering several dynamic ways of resolving available keywords at runtime. For more information, see http://code.google.com/p/robotframework-javalib-core/
5.4 Documentation formatting
It is possible to use simple HTML formatting with test suite, test case and user keyword documentation in the test data, as well as when documenting test libraries. The formatting is similar to the style used in most wikis, and it is designed to be understandable both as plain text and after the HTML transformation.
5.4.1 Representing newlines
The documentation used for test suites, test cases and keywords is subject to general parsing rules of the test data. This means that normal newlines are not preserved, and dividing documentation into lines and paragraphs requires using a literal newline character sequence (\n), as illustrated in the example below.
| Setting | Value |
|---|---|
| Documentation |
First line.\n \n Second paragraph, this time\n with multiple lines. |
With library documentations normal newlines are enough, and for example the following keyword documentation would create same end result as the above test suite documentation.
def example_keyword():
    """First line.

    Second paragraph, this time
    with multiple lines.
    """
    pass
5.4.2 Bold and italic
Bold text can be created by having an asterisk before and after the selected word or words, for example *this is bold*. Italic style works similarly, but the special character to use is an underscore, for example _italic_. It is also possible to have bold italic with the syntax _*bold italic*_.
An asterisk or an underscore alone, or in the middle of a word, does not start formatting, but punctuation characters before or after them are allowed. Both bold and italic are limited for formatting text on one line, and formatting spanning several lines must be explicitly started and stopped on every line.
| Unformatted | Formatted |
|---|---|
| *bold* | bold |
| _italic_ | italic |
| *bold* and then _italic_ | bold and then italic |
| _*bold italic*_, _italic_, nothing | bold italic, italic, nothing |
| This is *bold*\n *on multiple*\n *lines*. |
This is bold on multiple lines. |
5.4.3 URLs
All strings that look like URLs are automatically converted into a clickable link. For example, http://some.url turns into link.
5.4.4 Tables
Tables are created using the pipe character with whitespace around it as a cell boundary and the newline as a row separator. In library documentations normal newlines are enough, but in test suite, test case and keyword documentations the explicit newline character sequence (\n) is needed:
| *A*  | *B*   | *C*   |\n
| _1_  | Hello | world |\n
| _2_  | Hi    |       |\n
The created table always has a thin border and the text is left-aligned. Formatting using bold and italic works also in table cells, so it is possible to create headers. For example the above documentation would be formatted like this:
| A | B | C |
| 1 | Hello | world |
| 2 | Hi |
5.4.5 Horizontal ruler
Horizontal rulers (the <hr> tag) make it possible to separate larger sections from each others, and they can be created by having three hyphens alone in a line. With documentations in the test data literal newlines are, again, required:
Some text here.\n
\n
---\n
\n
More text...
5.5 Time format
Robot Framework has its own time format that is used by several keywords (for example Sleep and Wait Until Keyword Succeeds) as well as test case and user keyword timeouts. This format is meant to be both flexible to use and easy to understand.
5.5.1 Time as number
The time can always be given as a plain number, in which case it is interpreted to be seconds. Both integers and floating point numbers work, and it is possible to use either real numbers or strings containing numerical values. This format is useful, for example, when the actual time value is calculated.
5.5.2 Time as text
Representing the time as text means using a format such as 2 minutes 42 seconds, which is normally easier to understand than just having the value as seconds. It is, for example, not so easy to understand how long a time 4200 is in seconds, but 1 hour 10 minutes is clear immediately.
The basic idea of this format is having first a number and then a text specifying what time that number represents. Numbers can be either integers or floating point numbers, the whole format is case and space insensitive, and the available specifier texts are:
- days, day, d
- hours, hour, h
- minutes, minute, mins, min, m
- seconds, second, secs, sec, s
- milliseconds, millisecond, millis, ms
Examples:
1 min 30 secs
1.5 minutes
90 s
1 day 2 hours 3 minutes 4 seconds 5 milliseconds
1d 2h 3m 4s 5ms